สร้าง Resume ด้วย HTML + CSS
Assigment 1: นำเนื้อหาที่เรียนมา มาประยุกต์ใช้ในการสร้าง Resume

หลังจากที่เราเรียนรู้พื้นฐานกันไปแล้ว วันนี้เราจะมาลงมือทำ “Project Resume” ของจริงกันครับ โดยเป้าหมายคือการเปลี่ยนข้อมูลจากกระดาษ ให้กลายเป็นหน้าเว็บที่ส่งให้คนอื่นดูได้จริง!
Step 1: เตรียมไฟล์ตั้งต้น (Setup)
เราจะเริ่มจากการสร้างไฟล์หลัก 2 ไฟล์ตามสูตร External Stylesheet ที่เราเรียนมา เพื่อแยกส่วนโครงสร้าง (HTML) และการตกแต่ง (CSS) ออกจากกัน
1. สร้างไฟล์ main.css ไฟล์นี้จะเป็นตัวกำหนดหน้าตาของเว็บเราครับ (ใช้โค้ดชุดเดิมจากบทที่แล้วได้เลย)
📄 ไฟล์: main.css
/* กำหนดภาพรวมของทั้งหน้า /
body {
font-family: Arial, sans-serif; / ใช้ฟอนต์มาตรฐานที่อ่านง่าย /
color: #333333; / สีตัวอักษรเทาเข้ม (อ่านสบายตากว่าดำสนิท) /
line-height: 1.6; / ระยะห่างบรรทัด /
margin: 40px; / เว้นขอบหน้ากระดาษเข้ามา */
}
/* ตกแต่งหัวข้อชื่อเรา (H1) /
h1 {
color: #2c3e50; / สีน้ำเงินเข้ม /
text-transform: uppercase; / บังคับเป็นตัวพิมพ์ใหญ่หมด */
}
/* ตกแต่งหัวข้อรอง (H2) เช่น Experience, Education /
h2 {
color: #2980b9; / สีฟ้า /
border-bottom: 2px solid #eee; / ขีดเส้นใต้จางๆ แบ่งหมวดหมู่ */
padding-bottom: 10px;
}
/* ตกแต่งรูปโปรไฟล์ /
img {
width: 150px; / กำหนดความกว้าง /
border-radius: 50%; / ทำรูปให้เป็นวงกลม /
box-shadow: 0 4px 8px rgba(0,0,0,0.1); / ใส่เงาเล็กน้อยให้รูปลอยขึ้น */
}
/* ตกแต่งลิงก์ /
a {
color: #e67e22; / สีส้ม /
text-decoration: none; / เอาขีดเส้นใต้ออก */
}
/* เมื่อเอาเมาส์ไปชี้ที่ลิงก์ /
a:hover {
text-decoration: underline; / ให้มีขีดเส้นใต้กลับมา */
}
2. สร้างไฟล์ index.html สร้างโครงสร้างพื้นฐานและเชื่อมต่อกับไฟล์ CSS ให้เรียบร้อย
📄 ไฟล์: index.html
<link rel="stylesheet" href="CSS/main.css">
🎯 Result

Figure: Output
Step 2: ใส่ข้อมูลส่วนตัวและช่องทางติดต่อ (Contact Info)
ขั้นตอนนี้เราจะดึงข้อมูลจริงจาก CV ของคุณ มาใส่ลงในเว็บ โดยใช้ Tag พื้นฐานที่เรียนไปครับ:
<h1>: สำหรับชื่อ-นามสกุล<ul>และ<li>: สำหรับจัดรายการช่องทางติดต่อให้เป็นระเบียบ<a>: สำหรับทำลิ้งค์ไปยัง Email และ Portfolio<img>: สำหรับใส่รูปโปรไฟล์Photo.png
📄 ไฟล์: index.html
<link rel="stylesheet" href="CSS/main.css">
<h1>Nattapong Thanngam</h1>

<h2>Contact</h2>
<ul>
    <li><strong>Phone:</strong> 088-990-8878</li>

    <li>
        <strong>Email:</strong>
        <a href="designbynattapong@gmail.com">designbynattapong@gmail.com</a>
    </li>

    <li>
        <strong>Portfolio:</strong>
        <a href="https://medium.com/donato-story" target="_blank">Medium Blog</a>
    </li>
</ul>
📂 โครงสร้างโฟลเดอร์ (File Structure)
ไฟล์ต่างๆ ในโปรเจกต์จะต้องจัดวางตำแหน่งดังนี้ครับ:
- 📄
index.html(อยู่ที่ชั้นนอกสุด คู่กับรูป) - 🖼️
Photo.png(อยู่ที่ชั้นนอกสุด คู่กับ HTML) - 📂 CSS (โฟลเดอร์)
-📄main.css(ย้ายเข้าไปอยู่ในนี้)
🎯 Result

Figure: Output
Step 3: Resetting Default CSS (ล้างค่าเริ่มต้นของ Browser)
ก่อนที่เราจะลงมือแต่งสวย เราต้อง “ล้าง” ค่าเริ่มต้นของ Browser (User Agent Stylesheet) ออกก่อนครับ เพื่อให้เรากำหนดระยะห่างและขนาดต่างๆ ได้เอง 100% โดยไม่ต้องมาคอยแก้ค่า Default ของแต่ละ Browser ที่ไม่เหมือนกัน
แนะนำตัวช่วย: เราจะใช้ minireset.css ซึ่งเป็นไฟล์ CSS สำเร็จรูปขนาดเล็กที่นิยมใช้กันครับ
1. สร้างไฟล์ reset.css: ให้เข้าไปในโฟลเดอร์ CSS แล้วสร้างไฟล์ใหม่ชื่อ reset.css จากนั้นก๊อปปี้โค้ดด้านล่างนี้ไปวางทั้งหมดครับ (อย่าลืมกด Click ขวา → Fotmat Document จะได้อ่านง่ายขึ้น)
📄 ไฟล์: CSS/reset.css
/! minireset.css v0.0.6 | MIT License | github.com/jgthms/minireset.css /html,body,p,ol,ul,li,dl,dt,dd,blockquote,figure,fieldset,legend,textarea,pre,iframe,hr,h1,h2,h3,h4,h5,h6{margin:0;padding:0}h1,h2,h3,h4,h5,h6{font-size:100%;font-weight:normal}ul{list-style:none}button,input,select{margin:0}html{box-sizing:border-box},::before,*::after{box-sizing:inherit}img,video{height:auto;max-width:100%}iframe{border:0}table{border-collapse:collapse;border-spacing:0}td,th{padding:0}
(Credit: minireset.css on GitHub)
2. เชื่อมต่อไฟล์ใน HTML กลับมาที่ไฟล์ index.html ให้เพิ่ม <link> ของ reset.css เข้าไป โดยต้องวางไว้ "ก่อน" main.css เสมอ เพื่อให้มันล้างค่าก่อน แล้วค่อยให้ main.css ของเราทับค่าลงไป
📄 ไฟล์: index.html
<h1>Nattapong Thanngam</h1>

<h2>Contact</h2>
<ul>
    <li><strong>Phone:</strong> 088-990-8878</li>

    <li>
        <strong>Email:</strong>
        <a href="designbynattapong@gmail.com">designbynattapong@gmail.com</a>
    </li>

    <li>
        <strong>Portfolio:</strong>
        <a href="https://medium.com/donato-story" target="_blank">Medium Blog</a>
    </li>
</ul>
🎯 ผลลัพธ์ที่เปลี่ยนไป (Result)

Step 4: Setting Up CSS (Layout, Background & Fonts)
ในขั้นตอนนี้ เราจะเตรียม “โครงสร้าง” และ “วัตถุดิบ” ในการตกแต่งให้พร้อมก่อนลงสีจริงครับ
1. ใส่ Class ให้กับ HTML Elements
เพื่อให้เราสั่งงาน CSS ได้เจาะจงและเป็นระเบียบ เราจะทำการห่อหุ้มเนื้อหาทั้งหมดด้วย <div> ที่ชื่อว่า container และตั้งชื่อเล่น (Class) ให้กับชิ้นส่วนต่างๆ ครับ
สิ่งที่ต้องทำ: แก้ไขไฟล์ index.html โดยเพิ่ม Class ต่างๆ ดังนี้:
<div class="container">: ครอบเนื้อหาทั้งหมด (เพื่อเอาไว้จัดกึ่งกลางและใส่พื้นหลัง)class="avatar": ใส่ที่รูปโปรไฟล์class="name": ใส่ที่ชื่อ H1class="section-title": ใส่ที่หัวข้อ H2class="contact-list": ใส่ที่รายการ UL
📄 index.html
    <img class="avatar" src="Photo.png" alt="Nattapong Profile Photo">

    <h1 class="name">Nattapong Thanngam</h1>

    <h2 class="section-title">Contact</h2>

    <ul class="contact-list">
        <li><strong>Phone:</strong> 088-990-8878</li>
        <li>
            <strong>Email:</strong>
            <a href="designbynattapong@gmail.com">designbynattapong@gmail.com</a>
        </li>
        <li>
            <strong>Portfolio:</strong>
            <a href="https://medium.com/donato-story" target="_blank">Medium Blog</a>
        </li>
    </ul>

</div> </body>
2. เลือก Font สวยๆ จาก Google Fonts
เราจะใช้ฟอนต์ “Mali” (ลายมือน่ารักๆ) สำหรับหัวข้อ และ “Noto Sans Thai” (อ่านง่าย) สำหรับเนื้อหาทั่วไป
สิ่งที่ต้องทำ: นำ Code จาก Google Fonts ไปใส่ใน <head> ของไฟล์ index.html (วางไว้ก่อนไฟล์ CSS ของเราเสมอ)
📄 index.html
<link rel="preconnect" href="https://fonts.googleapis.com">
<link rel="preconnect" href="https://fonts.gstatic.com" crossorigin>
<link href="https://fonts.googleapis.com/css2?family=Mali:ital,wght@0,200;0,300;0,400;0,500;0,600;0,700;1,200;1,300;1,400;1,500;1,600;1,700&family=Noto+Sans+Thai:wght@100..900&display=swap" rel="stylesheet">

<link rel="stylesheet" href="CSS/reset.css">
<link rel="stylesheet" href="CSS/main.css">
    <img class="avatar" src="Photo.png" alt="Nattapong Profile Photo">

    <h1 class="name">Nattapong Thanngam</h1>

    <h2 class="section-title">Contact</h2>

    <ul class="contact-list">
        <li><strong>Phone:</strong> 088-990-8878</li>
        <li>
            <strong>Email:</strong>
            <a href="designbynattapong@gmail.com">designbynattapong@gmail.com</a>
        </li>
        <li>
            <strong>Portfolio:</strong>
            <a href="https://medium.com/donato-story" target="_blank">Medium Blog</a>
        </li>
    </ul>

</div> </body>
3. อัปเดต CSS (Layout & Typography)
เราจะกำหนดขนาดกระดาษ ใส่ภาพพื้นหลัง และตั้งค่าฟอนต์ครับ
- สิ่งที่ต้องเตรียม: หาภาพพื้นหลังสวยๆ มา 1 รูป ตั้งชื่อว่า
background_image.png(หรือ .jpg) แล้ววางไว้คู่กับไฟล์index.html(หรือถ้ายังไม่มีรูป ให้ใช้สีพื้นหลังแทนไปก่อนได้ครับ) - สิ่งที่ต้องทำ: แก้ไขไฟล์
main.cssโดยลบโค้ดเก่าทิ้ง (หรือแก้ทับ) เป็นโค้ดชุดใหม่นี้
📄 ไฟล์: CSS/main.css
/* 1. ตั้งค่า Font หลักของเว็บ */
body {
font-family: "Noto Sans Thai", sans-serif;
font-weight: 300;
color: #333;
background-color: #f4f4f4;
/* [นำกลับมา] เพิ่มระยะห่างบรรทัดให้อ่านง่าย */
line-height: 1.6;
}
/* 2. สร้าง Layout กระดาษ A4 (Container) /
.container {
width: 800px;
margin: 50px auto;
padding: 40px;
background-color: white; / สีสำรองกรณีรูปโหลดไม่ขึ้น */
/* [เทคนิค] ใช้ linear-gradient สีขาวโปร่งแสง 90% ซ้อนทับบนรูป */
background-image:
    linear-gradient(rgba(255, 255, 255, 0.9), rgba(255, 255, 255, 0.9)),
    url('../background_image.png');

background-size: cover;
background-position: center;

box-shadow: 0 0 15px rgba(0,0,0,0.1);
border-radius: 10px;
}
/* 3. ตั้งค่า Font หัวข้อ (ใช้ Mali) */
h1, h2, h3 {
font-family: "Mali", cursive;
font-weight: 700;
}
/* --- Class Styles จาก Google Fonts --- */
.mali-regular { font-family: "Mali", cursive; font-weight: 400; }
.mali-bold { font-family: "Mali", cursive; font-weight: 700; }
.noto-sans-thai-regular { font-family: "Noto Sans Thai", sans-serif; font-weight: 400; }
/* 4. ตกแต่ง Component ต่างๆ */
/* [ปรับปรุง] ใช้ .avatar แทน img เพื่อเจาะจงเฉพาะรูปโปรไฟล์ /
.avatar {
width: 150px;
border-radius: 50%;
border: 5px solid white; / ขอบขาวหนาๆ แบบสติกเกอร์ */
box-shadow: 0 2px 5px rgba(0,0,0,0.2);
}
.name {
color: #2c3e50;
margin-top: 15px;
font-size: 2.5rem;
/* [นำกลับมา] ถ้าชอบให้ชื่อเป็นตัวพิมพ์ใหญ่หมด ให้เปิดใช้บรรทัดล่างนี้ครับ */
/* text-transform: uppercase; */
}
.section-title {
color: #e67e22;
border-bottom: 2px dashed #ddd; /* เปลี่ยนเป็นเส้นประให้ดูขี้เล่นขึ้น */
margin-top: 30px;
margin-bottom: 15px;
}
/* [นำกลับมา] ตกแต่งลิงก์ */
a {
color: #e67e22;
text-decoration: none;
}
a:hover {
text-decoration: underline;
}
/* [เพิ่มเติม] จัดการรูปอื่นๆ (เช่นรูป Unsplash) ให้ไม่ล้นกรอบ */
img {
max-width: 100%;
height: auto;
}
🎯 ผลลัพธ์ (Result)
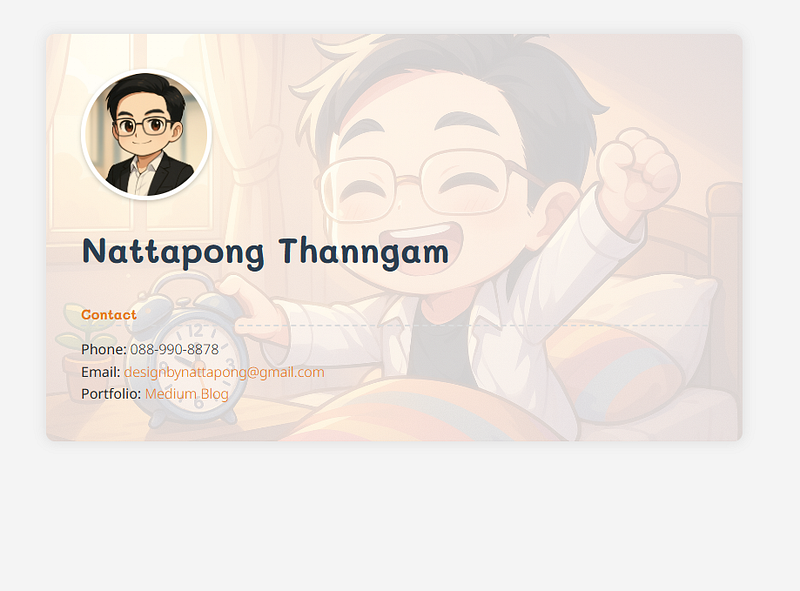
เมื่อ Save และ Refresh หน้าเว็บ:
- เนื้อหาทั้งหมดจะไปอยู่ กึ่งกลางหน้าจอ ในกล่องสีขาว (ขนาดประมาณกระดาษ A4)
- ฟอนต์จะเปลี่ยนเป็น Noto Sans Thai และหัวข้อเป็น Mali (ลายมือน่ารักๆ)
- มีไฟล์รูป
background_image.pngพื้นหลังของกล่องข้อความจะเป็นรูปนั้น
Step 5: Fixing Colors & Adding Work Layout
1. ปรับสีลิงก์ให้เข้มขึ้น (Improve Contrast)
โจทย์คือสีเดิม (ส้ม) อ่านยากบนพื้นขาว เราจะเปลี่ยนเป็นสีที่เข้มขึ้นและเพิ่มความหนาครับ
📄 ไฟล์: CSS/main.css (หาจุดที่เป็น a แล้วแก้โค้ดใหม่ทับลงไปครับ)
/* 1. ตั้งค่า Font หลักของเว็บ */
body {
font-family: "Noto Sans Thai", sans-serif;
font-weight: 300;
color: #333;
background-color: #f4f4f4;
/* [นำกลับมา] เพิ่มระยะห่างบรรทัดให้อ่านง่าย */
line-height: 1.6;
}
/* 2. สร้าง Layout กระดาษ A4 (Container) /
.container {
width: 800px;
margin: 50px auto;
padding: 40px;
background-color: white; / สีสำรองกรณีรูปโหลดไม่ขึ้น */
/* [เทคนิค] ใช้ linear-gradient สีขาวโปร่งแสง 90% ซ้อนทับบนรูป */
background-image:
    linear-gradient(rgba(255, 255, 255, 0.9), rgba(255, 255, 255, 0.9)),
    url('../background_image.png');

background-size: cover;
background-position: center;

box-shadow: 0 0 15px rgba(0,0,0,0.1);
border-radius: 10px;
}
/* 3. ตั้งค่า Font หัวข้อ (ใช้ Mali) */
h1, h2, h3 {
font-family: "Mali", cursive;
font-weight: 700;
}
/* --- Class Styles จาก Google Fonts --- */
.mali-regular { font-family: "Mali", cursive; font-weight: 400; }
.mali-bold { font-family: "Mali", cursive; font-weight: 700; }
.noto-sans-thai-regular { font-family: "Noto Sans Thai", sans-serif; font-weight: 400; }
/* 4. ตกแต่ง Component ต่างๆ */
/* [ปรับปรุง] ใช้ .avatar แทน img เพื่อเจาะจงเฉพาะรูปโปรไฟล์ /
.avatar {
width: 150px;
border-radius: 50%;
border: 5px solid white; / ขอบขาวหนาๆ แบบสติกเกอร์ */
box-shadow: 0 2px 5px rgba(0,0,0,0.2);
}
.name {
color: #2c3e50;
margin-top: 15px;
font-size: 2.5rem;
/* [นำกลับมา] ถ้าชอบให้ชื่อเป็นตัวพิมพ์ใหญ่หมด ให้เปิดใช้บรรทัดล่างนี้ครับ */
/* text-transform: uppercase; */
}
.section-title {
color: #e67e22;
border-bottom: 2px dashed #ddd; /* เปลี่ยนเป็นเส้นประให้ดูขี้เล่นขึ้น */
margin-top: 30px;
margin-bottom: 15px;
}
/* [แก้ไข] ปรับสีลิงก์ให้เข้มขึ้นและตัวหนา /
a {
color: #d35400; / เปลี่ยนจากส้มอ่อน เป็นส้มอิฐเข้มๆ (Pumpkin color) /
text-decoration: none;
font-weight: 700; / เพิ่มตัวหนาช่วยให้อ่านง่ายขึ้น */
}
a:hover {
color: #e67e22; /* พอเอาเมาส์ชี้ ค่อยสว่างขึ้น */
text-decoration: underline;
}
/* [เพิ่มเติม] จัดการรูปอื่นๆ (เช่นรูป Unsplash) ให้ไม่ล้นกรอบ */
img {
max-width: 100%;
height: auto;
}
2. เพิ่มส่วนประสบการณ์ทำงาน (Work Experience)
เราจะเพิ่มข้อมูล 4 ตำแหน่งล่าสุดของคุณลงไป โดยใช้ <div> ครอบแต่ละงานไว้ เพื่อให้เราจัด Layout ได้ง่ายๆ
📄 index.html (เพิ่มต่อจาก </ul> เดิม แต่ยังอยู่ภายใน </div> ของ .container นะครับ)
<link rel="preconnect" href="https://fonts.googleapis.com">
<link rel="preconnect" href="https://fonts.gstatic.com" crossorigin>
<link href="https://fonts.googleapis.com/css2?family=Mali:ital,wght@0,200;0,300;0,400;0,500;0,600;0,700;1,200;1,300;1,400;1,500;1,600;1,700&family=Noto+Sans+Thai:wght@100..900&display=swap" rel="stylesheet">

<link rel="stylesheet" href="CSS/reset.css">
<link rel="stylesheet" href="CSS/main.css">
    <img class="avatar" src="Photo.png" alt="Nattapong Profile Photo">

    <h1 class="name">Nattapong Thanngam</h1>

    <h2 class="section-title">Contact</h2>

    <ul class="contact-list">
        <li><strong>Phone:</strong> 088-990-8878</li>
        <li>
            <strong>Email:</strong>
            <a href="designbynattapong@gmail.com">designbynattapong@gmail.com</a>
        </li>
        <li>
            <strong>Portfolio:</strong>
            <a href="https://medium.com/donato-story" target="_blank">Medium Blog</a>
        </li>
    </ul>

    <hr class="divider">

    <h2 class="section-title">Work Experience</h2>

    <div class="job-item">
        <div class="job-header">
            <h3 class="job-title">HR AI Associate Director</h3>
            <span class="job-year">2025 - Present</span>
        </div>
        <p class="job-company">Charoen Pokphand Foods PCL (CPF)</p>
        <p class="job-desc">Leading strategic AI implementation for HR functions and designing Generative AI chatbots.</p>
    </div>

    <div class="job-item">
        <div class="job-header">
            <h3 class="job-title">Invited Lecturer</h3>
            <span class="job-year">2024 - Present</span>
        </div>
        <p class="job-company">University of the Thai Chamber of Commerce (UTCC)</p>
        <p class="job-desc">Teaching Data Analytics and Data Visualization.</p>
    </div>

    <div class="job-item">
        <div class="job-header">
            <h3 class="job-title">Data Scientist Team Lead</h3>
            <span class="job-year">2022 - 2025</span>
        </div>
        <p class="job-company">Data Café Co., Ltd.</p>
        <p class="job-desc">Directed multidisciplinary data team and led Machine Learning & GenAI projects.</p>
    </div>

    <div class="job-item">
        <div class="job-header">
            <h3 class="job-title">Vice President (Plant Manager)</h3>
            <span class="job-year">2021 - 2022</span>
        </div>
        <p class="job-company">Energy Absolute PLC</p>
        <p class="job-desc">Supervised operations across multiple units and managed a team of 50 staff.</p>
    </div>
</div> </body>
3. จัด Layout ด้วย CSS (The Magic of Flexbox)
เราจะใช้ Flexbox สั่งให้ชื่อตำแหน่ง (ซ้าย) และ ปี (ขวา) แยกออกจากกันโดยอัตโนมัติ
📄 CSS/main.css (เพิ่มต่อท้ายไฟล์ได้เลยครับ)
/* 1. ตั้งค่า Font หลักของเว็บ */
body {
font-family: "Noto Sans Thai", sans-serif;
font-weight: 300;
color: #333;
background-color: #f4f4f4;
/* [นำกลับมา] เพิ่มระยะห่างบรรทัดให้อ่านง่าย */
line-height: 1.6;
}
/* 2. สร้าง Layout กระดาษ A4 (Container) /
.container {
width: 800px;
margin: 50px auto;
padding: 40px;
background-color: white; / สีสำรองกรณีรูปโหลดไม่ขึ้น */
/* [เทคนิค] ใช้ linear-gradient สีขาวโปร่งแสง 80% ซ้อนทับบนรูป */
background-image:
    linear-gradient(rgba(255, 255, 255, 0.8), rgba(255, 255, 255, 0.8)),
    url('../background_image.png');

background-size: cover;
background-position: center;

box-shadow: 0 0 15px rgba(0,0,0,0.1);
border-radius: 10px;
}
/* 3. ตั้งค่า Font หัวข้อ (ใช้ Mali) */
h1, h2, h3 {
font-family: "Mali", cursive;
font-weight: 700;
}
/* --- Class Styles จาก Google Fonts --- */
.mali-regular { font-family: "Mali", cursive; font-weight: 400; }
.mali-bold { font-family: "Mali", cursive; font-weight: 700; }
.noto-sans-thai-regular { font-family: "Noto Sans Thai", sans-serif; font-weight: 400; }
/* 4. ตกแต่ง Component ต่างๆ */
/* [ปรับปรุง] ใช้ .avatar แทน img เพื่อเจาะจงเฉพาะรูปโปรไฟล์ /
.avatar {
width: 150px;
border-radius: 50%;
border: 5px solid white; / ขอบขาวหนาๆ แบบสติกเกอร์ */
box-shadow: 0 2px 5px rgba(0,0,0,0.2);
}
.name {
color: #2c3e50;
margin-top: 15px;
font-size: 2.5rem;
/* [นำกลับมา] ถ้าชอบให้ชื่อเป็นตัวพิมพ์ใหญ่หมด ให้เปิดใช้บรรทัดล่างนี้ครับ */
/* text-transform: uppercase; */
}
.section-title {
color: #e67e22;
border-bottom: 2px dashed #ddd; /* เปลี่ยนเป็นเส้นประให้ดูขี้เล่นขึ้น */
margin-top: 30px;
margin-bottom: 15px;
}
/* [แก้ไข] ปรับสีลิงก์ให้เข้มขึ้นและตัวหนา /
a {
color: #d35400; / เปลี่ยนจากส้มอ่อน เป็นส้มอิฐเข้มๆ (Pumpkin color) /
text-decoration: none;
font-weight: 700; / เพิ่มตัวหนาช่วยให้อ่านง่ายขึ้น */
}
a:hover {
color: #e67e22; /* พอเอาเมาส์ชี้ ค่อยสว่างขึ้น */
text-decoration: underline;
}
/* [เพิ่มเติม] จัดการรูปอื่นๆ (เช่นรูป Unsplash) ให้ไม่ล้นกรอบ */
img {
max-width: 100%;
height: auto;
}
/* --- ส่วนเพิ่มเติม Step 5 --- */
/* เส้นกั้นบางๆ */
.divider {
border: 0;
height: 1px;
background: #ccc;
margin: 30px 0;
}
/* กล่องครอบแต่ละงาน /
.job-item {
margin-bottom: 25px; / เว้นระยะห่างระหว่างงาน /
text-align: left; / บังคับเนื้อหาส่วนงานให้ชิดซ้าย (เผื่อข้างบนจัดกลางไว้) */
}
/* [สำคัญ] ส่วนหัวของงาน (ชื่อตำแหน่ง + ปี) /
.job-header {
display: flex; / เปิดโหมด Flexbox /
justify-content: space-between; / ผลักเนื้อหา 2 ก้อนให้แยกไปชิดซ้ายสุดและขวาสุด /
align-items: center; / จัดให้ตรงกันแนวตั้ง */
margin-bottom: 5px;
}
.job-title {
font-size: 1.2rem;
color: #2c3e50;
margin: 0; /* ล้างค่า default margin */
}
.job-year {
font-family: "Noto Sans Thai", sans-serif; /* ใช้ฟอนต์อ่านง่ายแทน Mali /
font-weight: 600;
color: #7f8c8d; / สีเทา /
background-color: #eee; / ไฮไลท์พื้นหลังหน่อย */
padding: 2px 8px;
border-radius: 4px;
font-size: 0.9rem;
}
.job-company {
font-style: italic; /* ตัวเอียง /
color: #e67e22; / สีส้ม */
font-weight: 500;
margin-bottom: 5px;
}
.job-desc {
color: #555;
font-size: 0.95rem;
}
🎯 ผลลัพธ์ (Result)
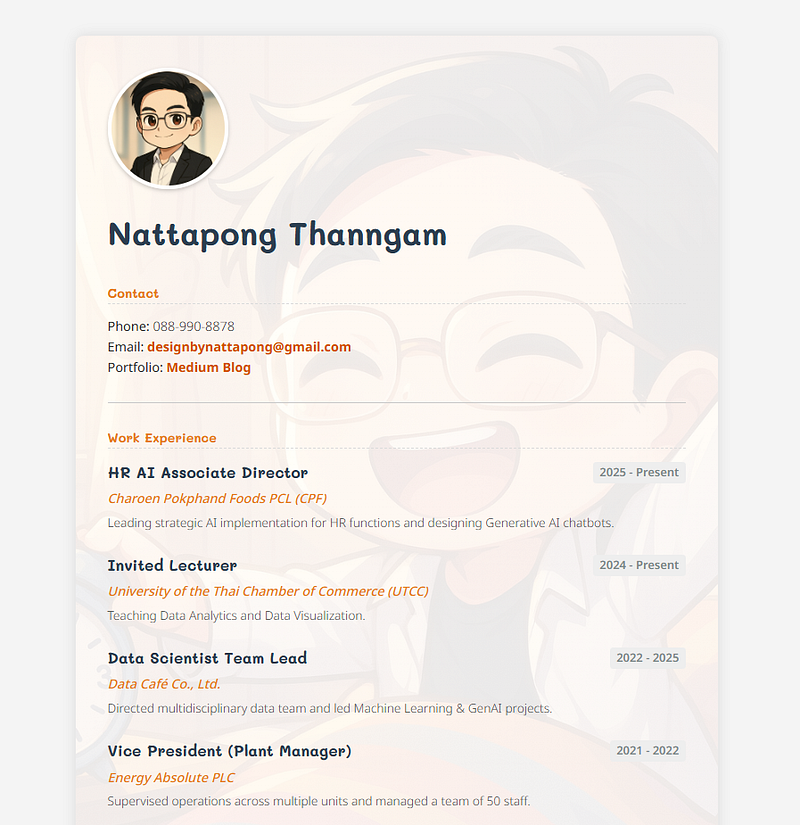
เมื่อ Save และ Refresh:
- ลิงก์ด้านบน: จะสีเข้มขึ้น อ่านชัดเจน
- มีเส้นกั้น: แบ่งโซนประวัติกับงานชัดเจน
- Layout งาน:
- ชื่อตำแหน่ง จะอยู่ซ้าย
- ปี (20xx — Present) จะเด้งไปอยู่ชิดขวา และมีกรอบสีเทารองพื้น
- ชื่อบริษัท เป็นตัวเอียงสีส้ม สวยงามครับ
Step 6: Professional Header & CTA Button
ในขั้นตอนนี้ เราจะรื้อโครงสร้างส่วนบน (Header) นิดหน่อย เพื่อจับกลุ่มก้อนข้อความไว้ด้วยกัน แล้วใช้ Flexbox ผลักให้รูปไปอยู่ด้านขวาครับ
1. ปรับโครงสร้าง HTML (Grouping)
เราต้องสร้างกล่องใหม่ชื่อ <header class="profile-header"> มาครอบส่วนชื่อและข้อมูลติดต่อ เพื่อแยกมันออกจากส่วนอื่นๆ แล้วย้ายรูป .avatar ไปไว้ด้านล่างของชื่อ (ใน HTML) เพื่อให้ตอนจัดหน้า มันจะไปอยู่ด้านขวา
📄 index.html
<link rel="preconnect" href="https://fonts.googleapis.com">
<link rel="preconnect" href="https://fonts.gstatic.com" crossorigin>
<link href="https://fonts.googleapis.com/css2?family=Mali:ital,wght@0,200;0,300;0,400;0,500;0,600;0,700;1,200;1,300;1,400;1,500;1,600;1,700&family=Noto+Sans+Thai:wght@100..900&display=swap" rel="stylesheet">

<link rel="stylesheet" href="CSS/reset.css">
<link rel="stylesheet" href="CSS/main.css">
    <header class="profile-header">

        <div class="header-text">
            <h1 class="name">Nattapong Thanngam</h1>

            <h2 class="section-title" style="margin-top: 10px;">Contact</h2>

            <ul class="contact-list">
                <li><strong>Phone:</strong> 088-990-8878</li>
                <li>
                    <strong>Email:</strong>
                    <a href="designbynattapong@gmail.com">designbynattapong@gmail.com</a>
                </li>
                <li>
                    <strong>Portfolio:</strong>
                    <a href="https://medium.com/donato-story" target="_blank">Medium Blog</a>
                </li>
            </ul>

            <a href="designbynattapong@gmail.com" class="btn">Contact Me</a>
        </div>

        <img class="avatar" src="Photo.png" alt="Nattapong Profile Photo">

    </header>

    <hr class="divider">

    <h2 class="section-title">Work Experience</h2>

    <div class="job-item">
        <div class="job-header">
            <h3 class="job-title">HR AI Associate Director</h3>
            <span class="job-year">2025 - Present</span>
        </div>
        <p class="job-company">Charoen Pokphand Foods PCL (CPF)</p>
        <p class="job-desc">Leading strategic AI implementation for HR functions and designing Generative AI chatbots.</p>
    </div>

    <div class="job-item">
        <div class="job-header">
            <h3 class="job-title">Invited Lecturer</h3>
            <span class="job-year">2024 - Present</span>
        </div>
        <p class="job-company">University of the Thai Chamber of Commerce (UTCC)</p>
        <p class="job-desc">Teaching Data Analytics and Data Visualization.</p>
    </div>

    <div class="job-item">
        <div class="job-header">
            <h3 class="job-title">Data Scientist Team Lead</h3>
            <span class="job-year">2022 - 2025</span>
        </div>
        <p class="job-company">Data Café Co., Ltd.</p>
        <p class="job-desc">Directed multidisciplinary data team and led Machine Learning & GenAI projects.</p>
    </div>

    <div class="job-item">
        <div class="job-header">
            <h3 class="job-title">Vice President (Plant Manager)</h3>
            <span class="job-year">2021 - 2022</span>
        </div>
        <p class="job-company">Energy Absolute PLC</p>
        <p class="job-desc">Supervised operations across multiple units and managed a team of 50 staff.</p>
    </div>
</div> </body>
2. เขียน CSS จัด Layout และแต่งปุ่ม
เราจะใช้ display: flex กับ .profile-header เพื่อให้กล่องข้อความกับรูปภาพ เรียงกันเป็นแนวนอนครับ
📄 CSS/main.css
/* 1. ตั้งค่า Font หลักของเว็บ */
body {
font-family: "Noto Sans Thai", sans-serif;
font-weight: 300;
color: #333;
background-color: #f4f4f4;
/* [นำกลับมา] เพิ่มระยะห่างบรรทัดให้อ่านง่าย */
line-height: 1.6;
}
/* 2. สร้าง Layout กระดาษ A4 (Container) /
.container {
width: 800px;
margin: 50px auto;
padding: 40px;
background-color: white; / สีสำรองกรณีรูปโหลดไม่ขึ้น */
/* [เทคนิค] ใช้ linear-gradient สีขาวโปร่งแสง 90% ซ้อนทับบนรูป */
background-image:
    linear-gradient(rgba(255, 255, 255, 0.9), rgba(255, 255, 255, 0.9)),
    url('../background_image.png');

background-size: cover;
background-position: center;

box-shadow: 0 0 15px rgba(0,0,0,0.1);
border-radius: 10px;
}
/* 3. ตั้งค่า Font หัวข้อ (ใช้ Mali) */
h1, h2, h3 {
font-family: "Mali", cursive;
font-weight: 700;
}
/* --- Class Styles จาก Google Fonts --- */
.mali-regular { font-family: "Mali", cursive; font-weight: 400; }
.mali-bold { font-family: "Mali", cursive; font-weight: 700; }
.noto-sans-thai-regular { font-family: "Noto Sans Thai", sans-serif; font-weight: 400; }
/* 4. ตกแต่ง Component ต่างๆ */
/* [ปรับปรุง] ใช้ .avatar แทน img เพื่อเจาะจงเฉพาะรูปโปรไฟล์ /
.avatar {
width: 150px;
border-radius: 50%;
border: 5px solid white; / ขอบขาวหนาๆ แบบสติกเกอร์ */
box-shadow: 0 2px 5px rgba(0,0,0,0.2);
}
.name {
color: #2c3e50;
margin-top: 15px;
font-size: 2.5rem;
/* [นำกลับมา] ถ้าชอบให้ชื่อเป็นตัวพิมพ์ใหญ่หมด ให้เปิดใช้บรรทัดล่างนี้ครับ */
/* text-transform: uppercase; */
}
.section-title {
color: #e67e22;
border-bottom: 2px dashed #ddd; /* เปลี่ยนเป็นเส้นประให้ดูขี้เล่นขึ้น */
margin-top: 30px;
margin-bottom: 15px;
}
/* [แก้ไข] ปรับสีลิงก์ให้เข้มขึ้นและตัวหนา /
a {
color: #d35400; / เปลี่ยนจากส้มอ่อน เป็นส้มอิฐเข้มๆ (Pumpkin color) /
text-decoration: none;
font-weight: 700; / เพิ่มตัวหนาช่วยให้อ่านง่ายขึ้น */
}
a:hover {
color: #e67e22; /* พอเอาเมาส์ชี้ ค่อยสว่างขึ้น */
text-decoration: underline;
}
/* [เพิ่มเติม] จัดการรูปอื่นๆ (เช่นรูป Unsplash) ให้ไม่ล้นกรอบ */
img {
max-width: 100%;
height: auto;
}
/* --- ส่วนเพิ่มเติม Step 5 --- */
/* เส้นกั้นบางๆ */
.divider {
border: 0;
height: 1px;
background: #ccc;
margin: 30px 0;
}
/* กล่องครอบแต่ละงาน /
.job-item {
margin-bottom: 25px; / เว้นระยะห่างระหว่างงาน /
text-align: left; / บังคับเนื้อหาส่วนงานให้ชิดซ้าย (เผื่อข้างบนจัดกลางไว้) */
}
/* [สำคัญ] ส่วนหัวของงาน (ชื่อตำแหน่ง + ปี) /
.job-header {
display: flex; / เปิดโหมด Flexbox /
justify-content: space-between; / ผลักเนื้อหา 2 ก้อนให้แยกไปชิดซ้ายสุดและขวาสุด /
align-items: center; / จัดให้ตรงกันแนวตั้ง */
margin-bottom: 5px;
}
.job-title {
font-size: 1.2rem;
color: #2c3e50;
margin: 0; /* ล้างค่า default margin */
}
.job-year {
font-family: "Noto Sans Thai", sans-serif; /* ใช้ฟอนต์อ่านง่ายแทน Mali /
font-weight: 600;
color: #7f8c8d; / สีเทา /
background-color: #eee; / ไฮไลท์พื้นหลังหน่อย */
padding: 2px 8px;
border-radius: 4px;
font-size: 0.9rem;
}
.job-company {
font-style: italic; /* ตัวเอียง /
color: #e67e22; / สีส้ม */
font-weight: 500;
margin-bottom: 5px;
}
.job-desc {
color: #555;
font-size: 0.95rem;
}
/* --- ส่วนเพิ่มเติม Step 6: Header Layout & Button --- */
/* 1. จัด Layout ส่วนหัว (ซ้าย: ข้อความ, ขวา: รูป) /
.profile-header {
display: flex; / เรียงเป็นแนวนอน /
justify-content: space-between; / ดันของ 2 ชิ้นไปชิดขอบซ้าย-ขวา /
align-items: flex-start; / จัดให้ชิดขอบบน (หรือจะใช้ center ก็ได้ถ้าอยากให้กลาง) /
margin-bottom: 30px; / เว้นระยะห่างจากเส้นกั้นด้านล่าง */
}
/* ปรับระยะห่างของกล่องข้อความนิดหน่อย /
.header-text {
flex: 1; / ให้กินพื้นที่ที่เหลือทั้งหมด /
padding-right: 40px; / เว้นระยะไม่ให้ตัวหนังสือชนรูป */
}
/* ปรับรูปโปรไฟล์ใหม่ /
.avatar {
/ ลบ width เดิมออก หรือเขียนทับ /
width: 180px; / ขยายให้ใหญ่ขึ้นนิดนึงดูเต็มตา /
border: 5px solid white;
box-shadow: 0 5px 15px rgba(0,0,0,0.15); / เงาฟุ้งๆ ดูแพง */
/* เพิ่มลูกเล่นเวลาเอาเมาส์ชี้รูป */
transition: transform 0.3s ease;
}
.avatar:hover {
transform: scale(1.05) rotate(3deg); /* ขยายและหมุนนิดๆ */
}
/* 2. สร้างปุ่ม Contact Me (Button Style) /
.btn {
display: inline-block; / เพื่อให้กำหนด padding/margin ได้ */
margin-top: 20px;
padding: 10px 25px;
background-color: #2c3e50; /* สีพื้นหลัง (น้ำเงินเข้มดูทางการ) */
color: white !important; /* บังคับตัวหนังสือสีขาว (ทับค่าเดิมของ a) */

border-radius: 50px; /* ทำปุ่มวงรี (Pill shape) */
font-family: "Mali", cursive; /* ใช้ฟอนต์น่ารักๆ */
font-weight: 700;
text-decoration: none; /* เอาขีดเส้นใต้ออก */

box-shadow: 0 4px 6px rgba(0,0,0,0.2); /* เงาปุ่ม */
transition: all 0.2s ease; /* เอฟเฟกต์สมูทๆ */
}
/* เอฟเฟกต์ตอนชี้ปุ่ม /
.btn:hover {
background-color: #e67e22; / เปลี่ยนเป็นสีส้ม /
transform: translateY(-2px); / ปุ่มลอยขึ้นนิดนึง /
box-shadow: 0 6px 12px rgba(0,0,0,0.3); / เงาชัดขึ้น /
text-decoration: none; / ย้ำว่าห้ามมีขีดเส้นใต้ */
}
🎯 ผลลัพธ์ที่ได้ (Result)
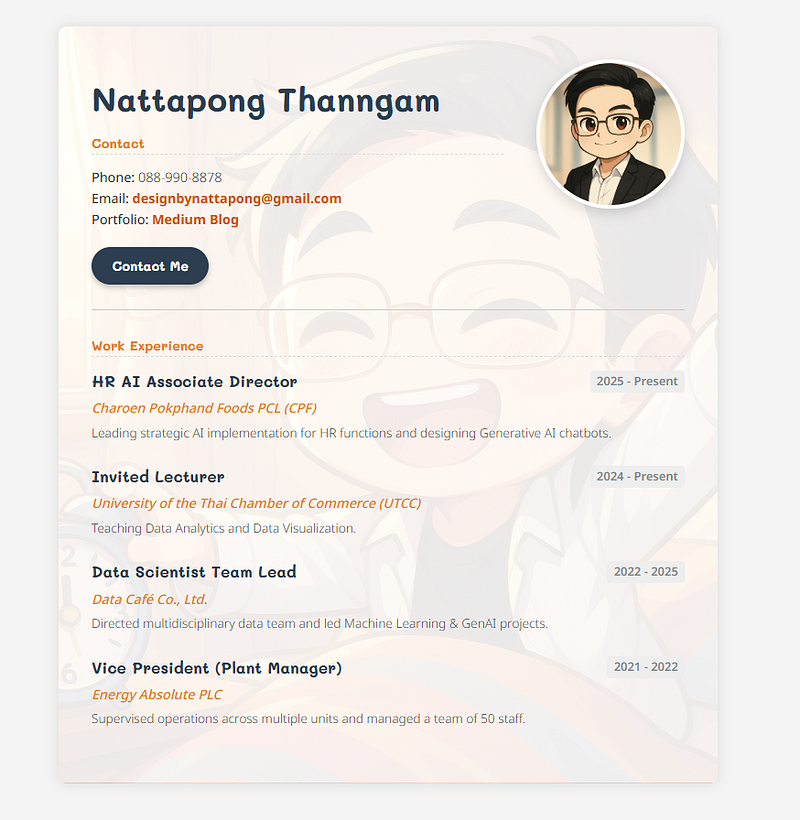
- Header ใหม่: ชื่อและข้อมูลจะอยู่ฝั่งซ้าย ส่วนรูปโปรไฟล์จะไปลอยเด่นอยู่ฝั่งขวา
- ปุ่ม Contact Me: จะปรากฏขึ้นใต้ข้อมูลติดต่อ เป็นปุ่มสีน้ำเงินเข้มโค้งมน เมื่อเอาเมาส์ไปชี้จะเปลี่ยนเป็นสีส้มและลอยขึ้นเล็กน้อย (Interactive สุดๆ!)
- รูปโปรไฟล์: ใหญ่ขึ้น และมีลูกเล่นขยับได้เมื่อเอาเมาส์ไปโดน
Step 7: Adding Icons & Polishing Background
เว็บสวยแล้ว แต่ยังขาด “สัญลักษณ์” ที่สื่อความหมาย ในขั้นตอนนี้เราจะเติมไอคอนหน้าข้อมูลติดต่อ และเปลี่ยนรูปพื้นหลังโดยดึงจากเว็บแจกรูปฟรีระดับโลกครับ
1. เพิ่มไอคอนด้วย FontAwesome
เราไม่ต้องนั่งวาดไอคอนเองครับ เราจะใช้บริการของ FontAwesome ซึ่งเป็นคลังไอคอนยอดฮิต
วิธีติดตั้ง (Setup):
- เข้าไปที่ fontawesome.com และ Log in (หรือสมัครสมาชิกฟรี)
- ไปที่เมนู “Kits” -> สร้าง Kit ใหม่ -> ก๊อปปี้โค้ด
<script src="...">ที่เขาให้มา - นำไปวางใน
<head>ของไฟล์index.html(วางไว้ก่อน CSS ของเรา) (หมายเหตุ: ถ้าขั้นตอนนี้ยุ่งยาก จะข้ามไปใช้วิธี CDN ชั่วคราวก็ได้ แต่สมัครเองดีที่สุดครับ)
วิธีเลือกและวางไอคอน: ค้นหาไอคอนที่ต้องการ (แนะนำให้ Filter เลือกแบบ Free) แล้วก๊อปปี้โค้ด <i>...</i> มาวางใน HTML ครับ
📄 index.html (ใส่โค้ด <i> ไว้หน้าข้อความ Phone, Email, Portfolio)
<link rel="preconnect" href="https://fonts.googleapis.com">
<link rel="preconnect" href="https://fonts.gstatic.com" crossorigin>
<link href="https://fonts.googleapis.com/css2?family=Mali:ital,wght@0,200;0,300;0,400;0,500;0,600;0,700;1,200;1,300;1,400;1,500;1,600;1,700&family=Noto+Sans+Thai:wght@100..900&display=swap" rel="stylesheet">
<link rel="stylesheet" href="https://cdnjs.cloudflare.com/ajax/libs/font-awesome/6.5.1/css/all.min.css">
<link rel="stylesheet" href="CSS/reset.css">
<link rel="stylesheet" href="CSS/main.css">
    <header class="profile-header">

        <div class="header-text">
            <h1 class="name">Nattapong Thanngam</h1>

            <h2 class="section-title" style="margin-top: 10px;">Contact</h2>

            <ul class="contact-list">
                <li>
                    <i class="fa-solid fa-phone"></i>
                    <strong>Phone:</strong> 088-990-8878
                </li>

                <li>
                    <i class="fa-solid fa-envelope"></i>
                    <strong>Email:</strong>
                    <a href="designbynattapong@gmail.com">designbynattapong@gmail.com</a>
                </li>

                <li>
                    <i class="fa-solid fa-briefcase"></i>
                    <strong>Portfolio:</strong>
                    <a href="https://medium.com/donato-story" target="_blank">Medium Blog</a>
                </li>
            </ul>

            <a href="designbynattapong@gmail.com" class="btn">Contact Me</a>
        </div>

        <img class="avatar" src="Photo.png" alt="Nattapong Profile Photo">

    </header>

    <hr class="divider">

    <h2 class="section-title">Work Experience</h2>

    <div class="job-item">
        <div class="job-header">
            <h3 class="job-title">HR AI Associate Director</h3>
            <span class="job-year">2025 - Present</span>
        </div>
        <p class="job-company">Charoen Pokphand Foods PCL (CPF)</p>
        <p class="job-desc">Leading strategic AI implementation for HR functions and designing Generative AI chatbots.</p>
    </div>

    <div class="job-item">
        <div class="job-header">
            <h3 class="job-title">Invited Lecturer</h3>
            <span class="job-year">2024 - Present</span>
        </div>
        <p class="job-company">University of the Thai Chamber of Commerce (UTCC)</p>
        <p class="job-desc">Teaching Data Analytics and Data Visualization.</p>
    </div>

    <div class="job-item">
        <div class="job-header">
            <h3 class="job-title">Data Scientist Team Lead</h3>
            <span class="job-year">2022 - 2025</span>
        </div>
        <p class="job-company">Data Café Co., Ltd.</p>
        <p class="job-desc">Directed multidisciplinary data team and led Machine Learning & GenAI projects.</p>
    </div>

    <div class="job-item">
        <div class="job-header">
            <h3 class="job-title">Vice President (Plant Manager)</h3>
            <span class="job-year">2021 - 2022</span>
        </div>
        <p class="job-company">Energy Absolute PLC</p>
        <p class="job-desc">Supervised operations across multiple units and managed a team of 50 staff.</p>
    </div>
</div> </body>
📄 CSS/main.css
/* 1. ตั้งค่า Font หลักของเว็บ */
body {
font-family: "Noto Sans Thai", sans-serif;
font-weight: 300;
color: #333;
background-color: #f4f4f4;
/* [นำกลับมา] เพิ่มระยะห่างบรรทัดให้อ่านง่าย */
line-height: 1.6;
}
/* 2. สร้าง Layout กระดาษ A4 (Container) /
.container {
width: 800px;
margin: 50px auto;
padding: 40px;
background-color: white; / สีสำรองกรณีรูปโหลดไม่ขึ้น */
/* [เทคนิค] ใช้ linear-gradient สีขาวโปร่งแสง 90% ซ้อนทับบนรูป */
background-image:
    linear-gradient(rgba(255, 255, 255, 0.9), rgba(255, 255, 255, 0.9)),
    url('../background_image.png');

background-size: cover;
background-position: center;

box-shadow: 0 0 15px rgba(0,0,0,0.1);
border-radius: 10px;
}
/* 3. ตั้งค่า Font หัวข้อ (ใช้ Mali) */
h1, h2, h3 {
font-family: "Mali", cursive;
font-weight: 700;
}
/* --- Class Styles จาก Google Fonts --- */
.mali-regular { font-family: "Mali", cursive; font-weight: 400; }
.mali-bold { font-family: "Mali", cursive; font-weight: 700; }
.noto-sans-thai-regular { font-family: "Noto Sans Thai", sans-serif; font-weight: 400; }
/* 4. ตกแต่ง Component ต่างๆ */
/* [ปรับปรุง] ใช้ .avatar แทน img เพื่อเจาะจงเฉพาะรูปโปรไฟล์ /
.avatar {
width: 150px;
border-radius: 50%;
border: 5px solid white; / ขอบขาวหนาๆ แบบสติกเกอร์ */
box-shadow: 0 2px 5px rgba(0,0,0,0.2);
}
.name {
color: #2c3e50;
margin-top: 15px;
font-size: 2.5rem;
/* [นำกลับมา] ถ้าชอบให้ชื่อเป็นตัวพิมพ์ใหญ่หมด ให้เปิดใช้บรรทัดล่างนี้ครับ */
/* text-transform: uppercase; */
}
.section-title {
color: #e67e22;
border-bottom: 2px dashed #ddd; /* เปลี่ยนเป็นเส้นประให้ดูขี้เล่นขึ้น */
margin-top: 30px;
margin-bottom: 15px;
}
/* [แก้ไข] ปรับสีลิงก์ให้เข้มขึ้นและตัวหนา /
a {
color: #d35400; / เปลี่ยนจากส้มอ่อน เป็นส้มอิฐเข้มๆ (Pumpkin color) /
text-decoration: none;
font-weight: 700; / เพิ่มตัวหนาช่วยให้อ่านง่ายขึ้น */
}
a:hover {
color: #e67e22; /* พอเอาเมาส์ชี้ ค่อยสว่างขึ้น */
text-decoration: underline;
}
/* [เพิ่มเติม] จัดการรูปอื่นๆ (เช่นรูป Unsplash) ให้ไม่ล้นกรอบ */
img {
max-width: 100%;
height: auto;
}
/* --- ส่วนเพิ่มเติม Step 5 --- */
/* เส้นกั้นบางๆ */
.divider {
border: 0;
height: 1px;
background: #ccc;
margin: 30px 0;
}
/* กล่องครอบแต่ละงาน /
.job-item {
margin-bottom: 25px; / เว้นระยะห่างระหว่างงาน /
text-align: left; / บังคับเนื้อหาส่วนงานให้ชิดซ้าย (เผื่อข้างบนจัดกลางไว้) */
}
/* [สำคัญ] ส่วนหัวของงาน (ชื่อตำแหน่ง + ปี) /
.job-header {
display: flex; / เปิดโหมด Flexbox /
justify-content: space-between; / ผลักเนื้อหา 2 ก้อนให้แยกไปชิดซ้ายสุดและขวาสุด /
align-items: center; / จัดให้ตรงกันแนวตั้ง */
margin-bottom: 5px;
}
.job-title {
font-size: 1.2rem;
color: #2c3e50;
margin: 0; /* ล้างค่า default margin */
}
.job-year {
font-family: "Noto Sans Thai", sans-serif; /* ใช้ฟอนต์อ่านง่ายแทน Mali /
font-weight: 600;
color: #7f8c8d; / สีเทา /
background-color: #eee; / ไฮไลท์พื้นหลังหน่อย */
padding: 2px 8px;
border-radius: 4px;
font-size: 0.9rem;
}
.job-company {
font-style: italic; /* ตัวเอียง /
color: #e67e22; / สีส้ม */
font-weight: 500;
margin-bottom: 5px;
}
.job-desc {
color: #555;
font-size: 0.95rem;
}
/* --- ส่วนเพิ่มเติม Step 6: Header Layout & Button --- */
/* 1. จัด Layout ส่วนหัว (ซ้าย: ข้อความ, ขวา: รูป) /
.profile-header {
display: flex; / เรียงเป็นแนวนอน /
justify-content: space-between; / ดันของ 2 ชิ้นไปชิดขอบซ้าย-ขวา /
align-items: flex-start; / จัดให้ชิดขอบบน (หรือจะใช้ center ก็ได้ถ้าอยากให้กลาง) /
margin-bottom: 30px; / เว้นระยะห่างจากเส้นกั้นด้านล่าง */
}
/* ปรับระยะห่างของกล่องข้อความนิดหน่อย /
.header-text {
flex: 1; / ให้กินพื้นที่ที่เหลือทั้งหมด /
padding-right: 40px; / เว้นระยะไม่ให้ตัวหนังสือชนรูป */
}
/* ปรับรูปโปรไฟล์ใหม่ /
.avatar {
/ ลบ width เดิมออก หรือเขียนทับ /
width: 180px; / ขยายให้ใหญ่ขึ้นนิดนึงดูเต็มตา /
border: 5px solid white;
box-shadow: 0 5px 15px rgba(0,0,0,0.15); / เงาฟุ้งๆ ดูแพง */
/* เพิ่มลูกเล่นเวลาเอาเมาส์ชี้รูป */
transition: transform 0.3s ease;
}
.avatar:hover {
transform: scale(1.05) rotate(3deg); /* ขยายและหมุนนิดๆ */
}
/* 2. สร้างปุ่ม Contact Me (Button Style) /
.btn {
display: inline-block; / เพื่อให้กำหนด padding/margin ได้ */
margin-top: 20px;
padding: 10px 25px;
background-color: #2c3e50; /* สีพื้นหลัง (น้ำเงินเข้มดูทางการ) */
color: white !important; /* บังคับตัวหนังสือสีขาว (ทับค่าเดิมของ a) */

border-radius: 50px; /* ทำปุ่มวงรี (Pill shape) */
font-family: "Mali", cursive; /* ใช้ฟอนต์น่ารักๆ */
font-weight: 700;
text-decoration: none; /* เอาขีดเส้นใต้ออก */

box-shadow: 0 4px 6px rgba(0,0,0,0.2); /* เงาปุ่ม */
transition: all 0.2s ease; /* เอฟเฟกต์สมูทๆ */
}
/* เอฟเฟกต์ตอนชี้ปุ่ม /
.btn:hover {
background-color: #e67e22; / เปลี่ยนเป็นสีส้ม /
transform: translateY(-2px); / ปุ่มลอยขึ้นนิดนึง /
box-shadow: 0 6px 12px rgba(0,0,0,0.3); / เงาชัดขึ้น /
text-decoration: none; / ย้ำว่าห้ามมีขีดเส้นใต้ */
}
/* --- ส่วนเพิ่มเติม Step 7 --- */
/* จัดระยะห่างไอคอนใน Contact List /
.contact-list li i {
margin-right: 10px; / เว้นระยะขวา 10px ให้ห่างจากตัวหนังสือ /
color: #d35400; / เปลี่ยนสีไอคอนให้เป็นสีส้ม (สีเดียวกับธีม) /
width: 20px; / กำหนดความกว้างให้เท่ากันทุกตัว ไอคอนจะได้ตรงแนว */
text-align: center;
}
2. เปลี่ยนพื้นหลังด้วยรูปจาก Unsplash (Online Image)
แทนที่จะใช้รูปในเครื่อง คราวนี้เราจะดึงรูปสวยๆ จาก Unsplash มาใช้โดยตรงผ่าน URL ครับ
วิธีทำ:
- เข้าไปที่ unsplash.com
- เลือกรูปที่ชอบ -> คลิกขวาที่รูป -> เลือก “Copy Image Address” (คัดลอกที่อยู่รูปภาพ)
- นำ URL ที่ได้มาใส่ใน CSS
📄 CSS/main.css
/* 1. ตั้งค่า Font หลักของเว็บ */
body {
font-family: "Noto Sans Thai", sans-serif;
font-weight: 300;
color: #333;
background-color: #f4f4f4;
/* [นำกลับมา] เพิ่มระยะห่างบรรทัดให้อ่านง่าย */
line-height: 1.6;
}
/* 2. สร้าง Layout กระดาษ A4 (Container) /
.container {
width: 800px;
margin: 50px auto;
padding: 40px;
background-color: white; / สีสำรองกรณีรูปโหลดไม่ขึ้น */
background-image:
    linear-gradient(rgba(255, 255, 255, 0.9), rgba(255, 255, 255, 0.9)),
    url('https://images.unsplash.com/photo-1498050108023-c5249f4df085?q=80&w=1172&auto=format&fit=crop');

background-size: cover;
background-position: center;

box-shadow: 0 0 15px rgba(0,0,0,0.1);
border-radius: 10px;
}
/* 3. ตั้งค่า Font หัวข้อ (ใช้ Mali) */
h1, h2, h3 {
font-family: "Mali", cursive;
font-weight: 700;
}
/* --- Class Styles จาก Google Fonts --- */
.mali-regular { font-family: "Mali", cursive; font-weight: 400; }
.mali-bold { font-family: "Mali", cursive; font-weight: 700; }
.noto-sans-thai-regular { font-family: "Noto Sans Thai", sans-serif; font-weight: 400; }
/* 4. ตกแต่ง Component ต่างๆ */
/* [ปรับปรุง] ใช้ .avatar แทน img เพื่อเจาะจงเฉพาะรูปโปรไฟล์ /
.avatar {
width: 150px;
border-radius: 50%;
border: 5px solid white; / ขอบขาวหนาๆ แบบสติกเกอร์ */
box-shadow: 0 2px 5px rgba(0,0,0,0.2);
}
.name {
color: #2c3e50;
margin-top: 15px;
font-size: 2.5rem;
/* [นำกลับมา] ถ้าชอบให้ชื่อเป็นตัวพิมพ์ใหญ่หมด ให้เปิดใช้บรรทัดล่างนี้ครับ */
/* text-transform: uppercase; */
}
.section-title {
color: #e67e22;
border-bottom: 2px dashed #ddd; /* เปลี่ยนเป็นเส้นประให้ดูขี้เล่นขึ้น */
margin-top: 30px;
margin-bottom: 15px;
}
/* [แก้ไข] ปรับสีลิงก์ให้เข้มขึ้นและตัวหนา /
a {
color: #d35400; / เปลี่ยนจากส้มอ่อน เป็นส้มอิฐเข้มๆ (Pumpkin color) /
text-decoration: none;
font-weight: 700; / เพิ่มตัวหนาช่วยให้อ่านง่ายขึ้น */
}
a:hover {
color: #e67e22; /* พอเอาเมาส์ชี้ ค่อยสว่างขึ้น */
text-decoration: underline;
}
/* [เพิ่มเติม] จัดการรูปอื่นๆ (เช่นรูป Unsplash) ให้ไม่ล้นกรอบ */
img {
max-width: 100%;
height: auto;
}
/* --- ส่วนเพิ่มเติม Step 5 --- */
/* เส้นกั้นบางๆ */
.divider {
border: 0;
height: 1px;
background: #ccc;
margin: 30px 0;
}
/* กล่องครอบแต่ละงาน /
.job-item {
margin-bottom: 25px; / เว้นระยะห่างระหว่างงาน /
text-align: left; / บังคับเนื้อหาส่วนงานให้ชิดซ้าย (เผื่อข้างบนจัดกลางไว้) */
}
/* [สำคัญ] ส่วนหัวของงาน (ชื่อตำแหน่ง + ปี) /
.job-header {
display: flex; / เปิดโหมด Flexbox /
justify-content: space-between; / ผลักเนื้อหา 2 ก้อนให้แยกไปชิดซ้ายสุดและขวาสุด /
align-items: center; / จัดให้ตรงกันแนวตั้ง */
margin-bottom: 5px;
}
.job-title {
font-size: 1.2rem;
color: #2c3e50;
margin: 0; /* ล้างค่า default margin */
}
.job-year {
font-family: "Noto Sans Thai", sans-serif; /* ใช้ฟอนต์อ่านง่ายแทน Mali /
font-weight: 600;
color: #7f8c8d; / สีเทา /
background-color: #eee; / ไฮไลท์พื้นหลังหน่อย */
padding: 2px 8px;
border-radius: 4px;
font-size: 0.9rem;
}
.job-company {
font-style: italic; /* ตัวเอียง /
color: #e67e22; / สีส้ม */
font-weight: 500;
margin-bottom: 5px;
}
.job-desc {
color: #555;
font-size: 0.95rem;
}
/* --- ส่วนเพิ่มเติม Step 6: Header Layout & Button --- */
/* 1. จัด Layout ส่วนหัว (ซ้าย: ข้อความ, ขวา: รูป) /
.profile-header {
display: flex; / เรียงเป็นแนวนอน /
justify-content: space-between; / ดันของ 2 ชิ้นไปชิดขอบซ้าย-ขวา /
align-items: flex-start; / จัดให้ชิดขอบบน (หรือจะใช้ center ก็ได้ถ้าอยากให้กลาง) /
margin-bottom: 30px; / เว้นระยะห่างจากเส้นกั้นด้านล่าง */
}
/* ปรับระยะห่างของกล่องข้อความนิดหน่อย /
.header-text {
flex: 1; / ให้กินพื้นที่ที่เหลือทั้งหมด /
padding-right: 40px; / เว้นระยะไม่ให้ตัวหนังสือชนรูป */
}
/* ปรับรูปโปรไฟล์ใหม่ /
.avatar {
/ ลบ width เดิมออก หรือเขียนทับ /
width: 180px; / ขยายให้ใหญ่ขึ้นนิดนึงดูเต็มตา /
border: 5px solid white;
box-shadow: 0 5px 15px rgba(0,0,0,0.15); / เงาฟุ้งๆ ดูแพง */
/* เพิ่มลูกเล่นเวลาเอาเมาส์ชี้รูป */
transition: transform 0.3s ease;
}
.avatar:hover {
transform: scale(1.05) rotate(3deg); /* ขยายและหมุนนิดๆ */
}
/* 2. สร้างปุ่ม Contact Me (Button Style) /
.btn {
display: inline-block; / เพื่อให้กำหนด padding/margin ได้ */
margin-top: 20px;
padding: 10px 25px;
background-color: #2c3e50; /* สีพื้นหลัง (น้ำเงินเข้มดูทางการ) */
color: white !important; /* บังคับตัวหนังสือสีขาว (ทับค่าเดิมของ a) */

border-radius: 50px; /* ทำปุ่มวงรี (Pill shape) */
font-family: "Mali", cursive; /* ใช้ฟอนต์น่ารักๆ */
font-weight: 700;
text-decoration: none; /* เอาขีดเส้นใต้ออก */

box-shadow: 0 4px 6px rgba(0,0,0,0.2); /* เงาปุ่ม */
transition: all 0.2s ease; /* เอฟเฟกต์สมูทๆ */
}
/* เอฟเฟกต์ตอนชี้ปุ่ม /
.btn:hover {
background-color: #e67e22; / เปลี่ยนเป็นสีส้ม /
transform: translateY(-2px); / ปุ่มลอยขึ้นนิดนึง /
box-shadow: 0 6px 12px rgba(0,0,0,0.3); / เงาชัดขึ้น /
text-decoration: none; / ย้ำว่าห้ามมีขีดเส้นใต้ */
}
/* --- ส่วนเพิ่มเติม Step 7 --- */
/* จัดระยะห่างไอคอนใน Contact List /
.contact-list li i {
margin-right: 10px; / เว้นระยะขวา 10px ให้ห่างจากตัวหนังสือ /
color: #d35400; / เปลี่ยนสีไอคอนให้เป็นสีส้ม (สีเดียวกับธีม) /
width: 20px; / กำหนดความกว้างให้เท่ากันทุกตัว ไอคอนจะได้ตรงแนว */
text-align: center;
}
🎯 ผลลัพธ์ (Result)
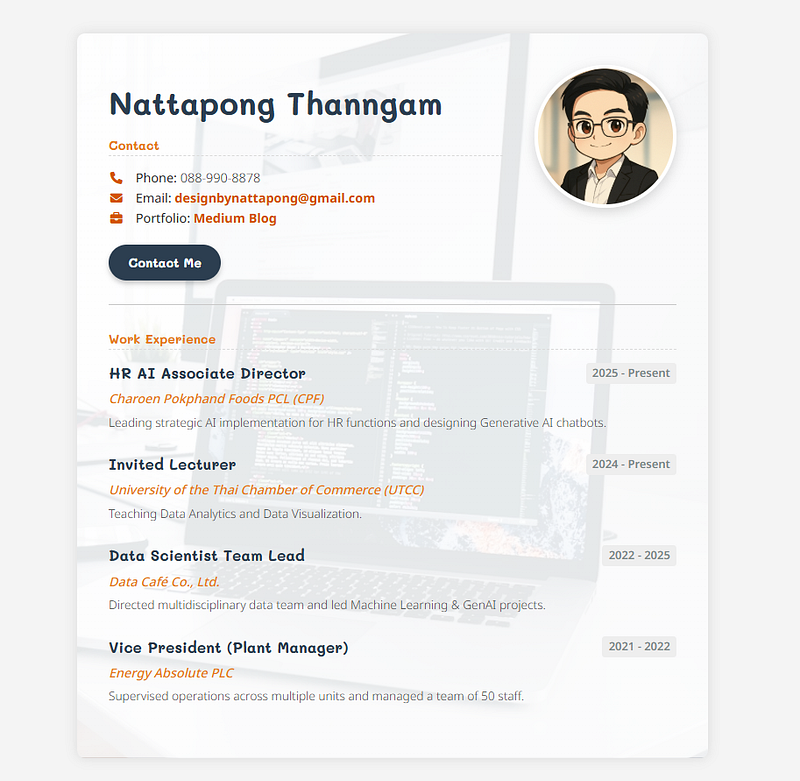
เมื่อ Refresh หน้าเว็บ:
- Icons: หน้าเบอร์โทร, อีเมล และ Portfolio จะมีไอคอนสีส้มสวยงาม และเว้นระยะห่างกำลังดี
- Background: พื้นหลังจะเปลี่ยนเป็นรูปโต๊ะทำงานเท่ๆ (จาก Unsplash) ที่ดูสะอาดตาเข้ากับ Resume ครับ
Step 8: Responsive Web Design
ตอนนี้เว็บเราสวยบนคอมพิวเตอร์ แต่ถ้าเปิดในมือถืออาจจะพัง (ตัวเล็กไป, รูปดันข้อความตกขอบ) เราจะมาแก้ด้วย 2 สิ่งนี้ครับ
1. เพิ่ม Meta Viewport Tag
📄 แก้ไขไฟล์: index.html และ my-work.html (ใส่ใน <head>)
</head>
2. ใช้ Media Query (CSS สำหรับจอมือถือ)
เราจะสั่งว่า “ถ้าหน้าจอเล็กกว่า 768px (ขนาด Tablet/Mobile) ให้เปลี่ยน Style บางอย่าง” สิ่งที่ควรปรับ:
- Container: ลดความกว้างจาก 800px ให้เต็มจอ (100%) และลด Padding
- Header: จากเดิมเรียงซ้าย-ขวา ให้เปลี่ยนมาเรียง แนวตั้ง (Column) แทน (รูปอยู่บน ชื่ออยู่ล่าง) เพื่อไม่ให้เบียดกัน
📄 แก้ไขไฟล์: CSS/main.css (เพิ่มต่อท้ายไฟล์สุด)
/* --- Step 8: Responsive Design (Mobile) --- */
/* เมื่อหน้าจอเล็กกว่า 768px (มือถือ/แท็บเล็ต) */
@media screen and (max-width: 768px) {
/* 1. ปรับกล่องกระดาษให้เต็มจอ */
.container {
    width: 100%; /* เต็มจอ */
    margin: 0; /* ชิดขอบ */
    padding: 20px; /* ลดขอบกระดาษลง (จากเดิม 40) จะได้มีที่วางเนื้อหา */
    border-radius: 0; /* ลบมุมโค้งออก */
}

/* 2. จัดส่วนหัวใหม่: ให้เรียงลงมาแนวตั้ง แทนแนวนอน */
.profile-header {
    flex-direction: column-reverse; /* ให้รูปขึ้นก่อน แล้วชื่อตามมาทีหลัง */
    align-items: center; /* จัดกึ่งกลาง */
    text-align: center; /* ตัวหนังสือจัดกลาง */
}

.header-text {
    padding-right: 0; /* เอาช่องว่างขวาออก */
}

.avatar {
    margin-bottom: 20px; /* ดันรูปลงมาห่างจากชื่อ */
}

/* 3. ปรับขนาดตัวหนังสือให้พอดี */
.name {
    font-size: 2rem; /* ลดขนาดชื่อลงหน่อย (จาก 2.5) */
}

/* ปรับระยะห่างปุ่ม */
.btn {
    margin-bottom: 20px;
}
}
Step 9: Linking to Other Pages
เราจะสร้างหน้าใหม่ชื่อ my-work.html และสร้างปุ่มเชื่อมโยงระหว่าง 2 หน้านี้ครับ
1. เปลี่ยนพื้นหลังด้วยรูปจาก Unsplash (Online Image)
📄 แก้ไขไฟล์: index.html (เพิ่มปุ่มข้างๆ Contact Me)
Contact Me
<a href="my-work.html" class="btn" style="background-color: #e67e22;">My Work</a>
2. สร้างไฟล์ **my-work.html**
สร้างไฟล์ใหม่ไว้ที่โฟลเดอร์เดียวกันกับ index.html อย่าลืมแต่ง my-.main.css ให้เข้ากับเนื้อหาของ my-work.html
ถ้าใครทำมาถึงจุดนี้ถูก คุณจะมี File ทั้งหมดตามนี้ครับ
📄 ไฟล์: index.html
<meta name="viewport" content="width=device-width, initial-scale=1.0">

<link rel="preconnect" href="https://fonts.googleapis.com">
<link rel="preconnect" href="https://fonts.gstatic.com" crossorigin>
<link href="https://fonts.googleapis.com/css2?family=Mali:ital,wght@0,200;0,300;0,400;0,500;0,600;0,700;1,200;1,300;1,400;1,500;1,600;1,700&family=Noto+Sans+Thai:wght@100..900&display=swap" rel="stylesheet">

<link rel="stylesheet" href="https://cdnjs.cloudflare.com/ajax/libs/font-awesome/6.5.1/css/all.min.css">

<link rel="stylesheet" href="CSS/reset.css">
<link rel="stylesheet" href="CSS/main.css">
    <header class="profile-header">

        <div class="header-text">
            <h1 class="name">Nattapong Thanngam</h1>

            <h2 class="section-title" style="margin-top: 10px;">Contact</h2>

            <ul class="contact-list">
                <li>
                    <i class="fa-solid fa-phone"></i>
                    <strong>Phone:</strong> 088-990-8878
                </li>

                <li>
                    <i class="fa-solid fa-envelope"></i>
                    <strong>Email:</strong>
                    <a href="designbynattapong@gmail.com">designbynattapong@gmail.com</a>
                </li>

                <li>
                    <i class="fa-solid fa-briefcase"></i>
                    <strong>Portfolio:</strong>
                    <a href="https://medium.com/donato-story" target="_blank">Medium Blog</a>
                </li>
            </ul>

            <div style="margin-top: 20px;">
                <a href="designbynattapong@gmail.com" class="btn">Contact Me</a>
                <a href="my-work.html" class="btn" style="background-color: #e67e22; margin-left: 10px;">My Work</a>
            </div>
        </div>

        <img class="avatar" src="Photo.png" alt="Nattapong Profile Photo">

    </header>

    <hr class="divider">

    <h2 class="section-title">Work Experience</h2>

    <div class="job-item">
        <div class="job-header">
            <h3 class="job-title">HR AI Associate Director</h3>
            <span class="job-year">2025 - Present</span>
        </div>
        <p class="job-company">Charoen Pokphand Foods PCL (CPF)</p>
        <p class="job-desc">Leading strategic AI implementation for HR functions and designing Generative AI chatbots.</p>
    </div>

    <div class="job-item">
        <div class="job-header">
            <h3 class="job-title">Invited Lecturer</h3>
            <span class="job-year">2024 - Present</span>
        </div>
        <p class="job-company">University of the Thai Chamber of Commerce (UTCC)</p>
        <p class="job-desc">Teaching Data Analytics and Data Visualization.</p>
    </div>

    <div class="job-item">
        <div class="job-header">
            <h3 class="job-title">Data Scientist Team Lead</h3>
            <span class="job-year">2022 - 2025</span>
        </div>
        <p class="job-company">Data Café Co., Ltd.</p>
        <p class="job-desc">Directed multidisciplinary data team and led Machine Learning & GenAI projects.</p>
    </div>

    <div class="job-item">
        <div class="job-header">
            <h3 class="job-title">Vice President (Plant Manager)</h3>
            <span class="job-year">2021 - 2022</span>
        </div>
        <p class="job-company">Energy Absolute PLC</p>
        <p class="job-desc">Supervised operations across multiple units and managed a team of 50 staff.</p>
    </div>
</div>
📄 ไฟล์: my-work.html
<link rel="preconnect" href="https://fonts.googleapis.com">
<link rel="preconnect" href="https://fonts.gstatic.com" crossorigin>
<link href="https://fonts.googleapis.com/css2?family=Mali:wght@400;700&family=Noto+Sans+Thai:wght@300;600&display=swap" rel="stylesheet">
<link rel="stylesheet" href="https://cdnjs.cloudflare.com/ajax/libs/font-awesome/6.5.1/css/all.min.css">

<link rel="stylesheet" href="CSS/reset.css">
<link rel="stylesheet" href="CSS/main.css">
    <a href="index.html" class="back-link">
        <i class="fa-solid fa-arrow-left"></i> Back to Resume
    </a>

    <header style="text-align: center; margin-bottom: 40px;">
        <h1 class="name">My Portfolio</h1>
        <p>รวมผลงานที่ผ่านมาของผมครับ</p>
    </header>

    <div class="project-grid">

        <div class="project-card">
            <h3>🤖 Chat with HR Document</h3>
            <p>AI-powered HR assistant for employee support.</p>
            <span class="tag">GenAI</span> <span class="tag">Python</span>
        </div>

        <div class="project-card">
            <h3>📊 Supply Chain Dashboard</h3>
            <p>Designed dashboards for dealer performance monitoring.</p>
            <span class="tag">Data Viz</span> <span class="tag">PowerBI</span>
        </div>

         <div class="project-card">
            <h3>🎥 VDO Summarization</h3>
            <p>Tool to summarize board meetings highlighting key topics.</p>
            <span class="tag">AI</span> <span class="tag">NLP</span>
        </div>

    </div>

</div>
📄 ไฟล์: CSS/main.css
/* 1. ตั้งค่า Font หลักของเว็บ */
body {
font-family: "Noto Sans Thai", sans-serif;
font-weight: 300;
color: #333;
background-color: #f4f4f4;
line-height: 1.6;
}
/* 2. สร้าง Layout กระดาษ A4 (Container) */
.container {
width: 800px;
margin: 50px auto;
padding: 40px;
background-color: white;
/* Background Image from Unsplash */
background-image:
    linear-gradient(rgba(255, 255, 255, 0.9), rgba(255, 255, 255, 0.9)),
    url('https://images.unsplash.com/photo-1498050108023-c5249f4df085?q=80&w=1172&auto=format&fit=crop');

background-size: cover;
background-position: center;

box-shadow: 0 0 15px rgba(0,0,0,0.1);
border-radius: 10px;
}
/* 3. ตั้งค่า Font หัวข้อ (ใช้ Mali) */
h1, h2, h3 {
font-family: "Mali", cursive;
font-weight: 700;
}
/* --- Class Styles จาก Google Fonts --- */
.mali-regular { font-family: "Mali", cursive; font-weight: 400; }
.mali-bold { font-family: "Mali", cursive; font-weight: 700; }
.noto-sans-thai-regular { font-family: "Noto Sans Thai", sans-serif; font-weight: 400; }
/* 4. ตกแต่ง Component ต่างๆ /
.avatar {
width: 180px; / ขนาดรูปโปรไฟล์ */
border-radius: 50%;
border: 5px solid white;
box-shadow: 0 5px 15px rgba(0,0,0,0.15);
transition: transform 0.3s ease;
}
.avatar:hover {
transform: scale(1.05) rotate(3deg);
}
.name {
color: #2c3e50;
margin-top: 15px;
font-size: 2.5rem;
}
.section-title {
color: #e67e22;
border-bottom: 2px dashed #ddd;
margin-top: 30px;
margin-bottom: 15px;
}
a {
color: #d35400;
text-decoration: none;
font-weight: 700;
}
a:hover {
color: #e67e22;
text-decoration: underline;
}
img {
max-width: 100%;
height: auto;
}
/* เส้นกั้นบางๆ */
.divider {
border: 0;
height: 1px;
background: #ccc;
margin: 30px 0;
}
/* กล่องครอบแต่ละงาน */
.job-item {
margin-bottom: 25px;
text-align: left;
}
/* ส่วนหัวของงาน (ชื่อตำแหน่ง + ปี) */
.job-header {
display: flex;
justify-content: space-between;
align-items: center;
margin-bottom: 5px;
}
.job-title {
font-size: 1.2rem;
color: #2c3e50;
margin: 0;
}
.job-year {
font-family: "Noto Sans Thai", sans-serif;
font-weight: 600;
color: #7f8c8d;
background-color: #eee;
padding: 2px 8px;
border-radius: 4px;
font-size: 0.9rem;
}
.job-company {
font-style: italic;
color: #e67e22;
font-weight: 500;
margin-bottom: 5px;
}
.job-desc {
color: #555;
font-size: 0.95rem;
}
/* --- Header Layout & Button --- */
.profile-header {
display: flex;
justify-content: space-between;
align-items: flex-start;
margin-bottom: 30px;
}
.header-text {
flex: 1;
padding-right: 40px;
}
/* ปุ่มกด (Button Style) */
.btn {
display: inline-block;
padding: 10px 25px;
background-color: #2c3e50;
color: white !important;
border-radius: 50px;
font-family: "Mali", cursive;
font-weight: 700;
text-decoration: none;
box-shadow: 0 4px 6px rgba(0,0,0,0.2);
transition: all 0.2s ease;
}
.btn:hover {
background-color: #e67e22;
transform: translateY(-2px);
box-shadow: 0 6px 12px rgba(0,0,0,0.3);
text-decoration: none;
}
/* ไอคอนใน Contact List */
.contact-list li i {
margin-right: 10px;
color: #d35400;
width: 20px;
text-align: center;
}
/* --- Step 8: Responsive Design (Mobile) --- */
@media screen and (max-width: 768px) {
.container {
width: 100%;
margin: 0;
padding: 20px;
border-radius: 0;
}
.profile-header {
    flex-direction: column-reverse;
    align-items: center;
    text-align: center;
}

.header-text {
    padding-right: 0;
}

.avatar {
    margin-bottom: 20px;
}

.name {
    font-size: 2rem;
}

.btn {
    margin-bottom: 10px; /* ลดช่องว่างปุ่มหน่อยในมือถือ */
}
}
/* --- Step 9: My Work Page Styles --- */
.back-link {
display: inline-block;
margin-bottom: 20px;
color: #7f8c8d;
font-weight: 600;
}
.back-link:hover {
color: #2c3e50;
text-decoration: none;
}
/* Grid สำหรับวางการ์ดผลงาน */
.project-grid {
display: grid;
grid-template-columns: repeat(auto-fit, minmax(250px, 1fr));
gap: 20px;
}
.project-card {
background: #f9f9f9;
padding: 20px;
border-radius: 8px;
border: 1px solid #eee;
transition: transform 0.2s;
}
.project-card:hover {
transform: translateY(-5px);
box-shadow: 0 5px 15px rgba(0,0,0,0.1);
}
.project-card h3 {
color: #2c3e50;
margin-bottom: 10px;
}
.tag {
display: inline-block;
background: #e67e22;
color: white;
font-size: 0.8rem;
padding: 2px 8px;
border-radius: 4px;
margin-right: 5px;
font-family: Arial, sans-serif;
}
🎯 ผลลัพธ์ (Result)
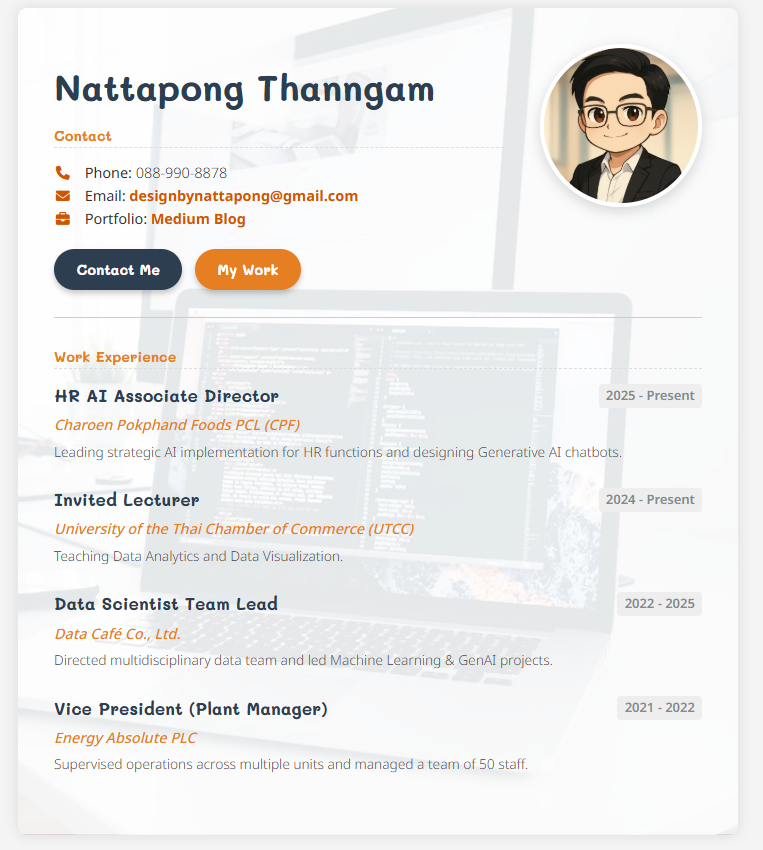
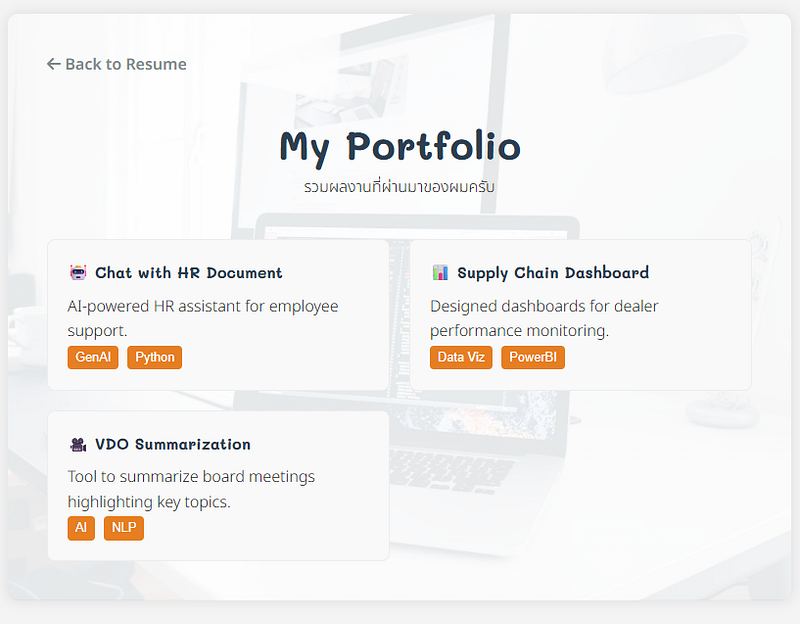
Step 10: Deploying to GitHub Pages
ขั้นตอนสุดท้าย! เอาเว็บขึ้นให้โลกเห็นครับ
- เข้าสู่ GitHub: ไปที่ github.com และ Log in
- สร้าง Repository ใหม่:
- กดปุ่ม New (สีเขียว)
- Repository name: ตั้งชื่อว่าyourname.github.io(เช่นnattapong-resume.github.io) สำคัญมาก! ต้องลงท้ายด้วย .github.io
- เลือก Public
- กด Create repository - อัปโหลดไฟล์:
- ในหน้าถัดมา กดลิงก์ “uploading an existing file”
- ลากไฟล์ทั้งหมดในโฟลเดอร์งานของเรา (index.html,my-work.html,Photo.png, โฟลเดอร์CSS) ลงไปในกล่อง
- รอโหลดเสร็จ พิมพ์ช่อง Commit changes ว่า “First upload” แล้วกดปุ่มสีเขียว Commit changes - ตั้งค่า (Settings):
- ไปที่แท็บ Settings (รูปเฟืองด้านบน)
- เมนูซ้ายมือ เลือก Pages
- ตรง Build and deployment -> Branch ให้เลือกเป็นmainและโฟลเดอร์เป็น/(root)- กด Save - รอสักครู่: รีเฟรชหน้าจอ รอจนมีแถบสีเขียวขึ้นว่า “Your site is live at…”
ยินดีด้วยครับ! ตอนนี้คุณมี Resume ออนไลน์ที่เป็นฝีมือตัวเอง 100% แล้ว สิ่งที่ควรศึกษาต่อ:
- CSS Frameworks: ลองศึกษา Bootstrap หรือ Tailwind CSS จะช่วยให้จัดหน้าเว็บสวยๆ ได้เร็วกว่าเขียนเองครับ
- JavaScript: ถ้าอยากให้เว็บคำนวณเลขได้, กดปุ่มแล้วมี Pop-up เด้ง หรือทำลูกเล่นภาพเคลื่อนไหว ต้องจัดตัวนี้ต่อครับ
- Git Command Line: ตอนนี้เราใช้แบบลากวาง (Upload) แต่อนาคตถ้าทำงานจริง การใช้คำสั่ง
git pushผ่านจอดำๆ จะเท่และโปรมากๆ ครับ
ขอให้สนุกกับการทำเว็บนะครับ! ถ้ามีโอกาสอย่าลืมส่งลิงก์มาอวดกันบ้างนะครับ ถ้าชอบบทความนี้ ฝากกด Follow และแชร์เป็นกำลังใจให้ด้วยนะครับ แล้วเจอกันใหม่บทความหน้าครับ! 👋❤️
Data Science Explore the world of data science with Donato_Story
Dashboard Discover the power of data visualization with Donato_Story
Donato_Journey Join me on my journey (Thai version)
Course_Review Discover the training courses with Donato_Story (Thai version)
Let’s Connect!
Your thoughts and feedback are invaluable. Feel free to share them in the comments or connect with me on
- Medium: medium.com/donato-story
- Facebook: web.facebook.com/DonatoStory
- Linkedin: linkedin.com/in/nattapong-thanngam
Originally published on Medium
Related
CSS 101
เปลี่ยนหน้าเว็บ HTML ธรรมดา ให้สวยสะดุดตาด้วย CSS (ฉบับมือใหม่)

Exploring LangGraph with LangChain
Data Mastery Series — Episode 44: LangChain Website (Part 19)

Make.com Workflow Inspiration & Pro Tips
EP3: รวม Workflow ไอเดียเด็ด พร้อม Tips & Tricks ต่างๆ

People Analytics: ปลดล็อกข้อมูล “คน” เพื่อขับเคลื่อนความสำเร็จขององค์กร
การใช้ข้อมูลด้านบุคลากร เพื่อขับเคลื่อนองค์กรอย่างมีกลยุทธ์