Unpacking LangGraph with LangChain
Data Mastery Series — Episode 43: LangChain Website (Part 18)
Connect with me and follow our journey: Linkedin, Facebook
Welcome back to the Data Mastery Series! In this episode, we’ll dive into LangGraph, an innovative framework that’s reshaping the way we build stateful, multi-actor applications powered by Large Language Models (LLMs). LangGraph enables cycles, branching, and fine-grained control over workflows, making it an essential tool for creating robust AI-driven applications.
Missed an episode? Here’s a quick recap of our journey so far:
- Part 1: LangChain Model I/O Basics
- Part 2–3: Prompt Templates and Few-Shot Prompts
- Part 4–6: Deep Dive into Chat Models (Part 1, Part 2, Part 3)
- Part 7: LLM Fundamentals
- Part 8: Output Parsers
- Part 9: Document Loaders
- Part 10: Text Splitter
- Part 11: Embeddings and Vector Stores
- Part 12–14: Retrievers (Part 1, Part 2, Part3)
- Part 15–16: Agent (Part 1, Part 2)
- Part 17: Tools and Chain
Note:This post is inspired by insights from the official LangChain documentation and represents my practical learning journey.
What is LangGraph?
LangGraph is a low-level framework tailored for building advanced agent and multi-agent workflows. Unlike traditional Directed Acyclic Graphs (DAGs), LangGraph supports cycles and loops, essential for creating dynamic and flexible workflows.
Key Features:
- Cycles and Branching: Implement loops and conditionals for dynamic workflows.
- Persistence: Save execution states after every step for recovery and resumption.
- Human-in-the-Loop: Enable manual intervention to review or modify actions.
- Streaming Support: Stream real-time outputs for enhanced interactivity.
- Integration: Works seamlessly with LangChain and LangSmith while remaining flexible for standalone use.
For large-scale deployments, the LangGraph Platform provides additional features, such as support for background processes, long-running agents, and infrastructure for handling complex workflows.
Hands-On with LangGraph
Let’s see how LangGraph works through a practical example: building an agent that uses a search tool.
Example - Hands-On with LangGraph
###############################################
Step 1: Set Up Tools
###############################################
Define the tools for the agent to use
def search(query: str):
"""Simulated web search."""
if "sf" in query.lower() or "san francisco" in query.lower():
return "It's 60 degrees and foggy."
return "It's 90 degrees and sunny."
tools = [search]
tool_node = ToolNode(tools)
Define a model with tools and prompt
prompt = ChatPromptTemplate.from_messages(
[
("system", "You are a helpful assistant"),
MessagesPlaceholder("chat_history", optional=True),
("human", "{messages}"),
MessagesPlaceholder("agent_scratchpad", optional=True),
]
)
model = prompt | ChatOpenAI(model="gpt-3.5-turbo", temperature=0, api_key=OPENAI_API_KEY).bind_tools(tools)
Define the function that determines whether to continue or not
def should_continue(state: MessagesState) -> Literal["tools", END]:
messages = state['messages']
last_message = messages[-1]
# If the LLM makes a tool call, then we route to the "tools" node
if last_message.tool_calls:
return "tools"
# Otherwise, we stop (reply to the user)
return END
Define the function that calls the model
def call_model(state: MessagesState):
messages = state['messages']
response = model.invoke(messages)
# We return a list, because this will get added to the existing list
return {"messages": [response]}
###############################################
Step 2: Define and Compile the Graph
###############################################
workflow = StateGraph(MessagesState)
Add nodes for agent logic and tools
workflow.add_node("agent", call_model)
workflow.add_node("tools", tool_node)
Add edges and conditional paths
workflow.add_edge(START, "agent")
workflow.add_conditional_edges("agent", should_continue)
workflow.add_edge("tools", "agent")
Add memory to persist state
checkpointer = MemorySaver()
Compile the workflow
app = workflow.compile(checkpointer=checkpointer)
Optional: Visualize the graph
try:
display(Image(app.get_graph().draw_mermaid_png()))
except Exception:
pass # Visualization is optional
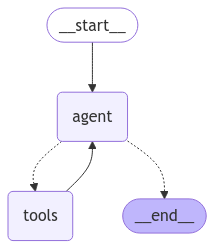
Figure: A visual representation of the LangGraph workflow we’ve created
Example - Hands-On with LangGraph continues
###############################################
Step 3: Execute the Graph
###############################################
Execution 1: Ask about San Francisco
final_state = app.invoke(
{"messages": [HumanMessage(content="what is the weather in sf")]},
config={"configurable": {"thread_id": 42}}
)
print(final_state["messages"][-1].content)
output of execution 1
'''
The weather in San Francisco is currently 60 degrees and foggy.
'''
###############################################
Execution 2: Follow-up about New York
final_state = app.invoke(
{"messages": "what about ny"},
config={"configurable": {"thread_id": 42}}
)
final_state["messages"][-1].content
output of execution 2
'''
The weather in San Francisco is currently 60 degrees and foggy.
For New York, the weather is 90 degrees and sunny.
'''
Step-by-Step Breakdown
- Setup: Use ChatOpenAI as the LLM and bind tools to the model.
- Initialize the Graph: Create a graph using
StateGraphand define its state schema. - Define Graph Nodes:
- Agent Node: Decides the next action.
- Tools Node: Executes an action when called by the agent. - Entry Point and Edges:
- Set the entry point at the agent node.
- Add conditional edges to dynamically determine the next step. - Compile the Graph: Convert the graph into a LangChain Runnable to enable execution, streaming, and batching.
- Execute the Graph: Input flows through the nodes, alternating between agent and tools until the workflow completes.
In this episode, we explored how LangGraph simplifies the development of dynamic workflows with cycles, branching, and persistence. It’s a powerful tool for creating stateful, multi-actor applications.
In the next episode, Stay tuned as we continue to explore LangGraph’s potential — covering maintaining conversation state, handling complex queries, and more! 🚀
Data Science Explore the world of data science with Donato_Story
Dashboard Discover the power of data visualization with Donato_Story
Donato_Journey Join me on my journey (Thai version)
Course_Review Discover the training courses with Donato_Story (Thai version)
Let’s Connect!
Your thoughts and feedback are invaluable. Feel free to share them in the comments or connect with me on
- Medium: medium.com/donato-story
- Facebook: web.facebook.com/DonatoStory
- Linkedin: linkedin.com/in/nattapong-thanngam
Originally published on Medium
Related
Corrective RAG
Data Mastery Series — Episode 53: RAG ที่ “คิด” ก่อน “ตอบ” และ “แก้ไข” เมื่อผิดพลาด
Exploring Agent with LangChain
Data Mastery Series — Episode 41: LangChain Website (Part 16)
Exploring LangGraph with LangChain
Data Mastery Series — Episode 44: LangChain Website (Part 19)
Hierarchical Multi-Agent Systems
Data Mastery Series — Episode 59: การสร้างระบบ AI ทีมงานด้วย Supervisor Agent กับทีมย่อย