สร้าง App ด้วย Lovable + Claude Code
บันทึก Vibe Coding แรกของผม
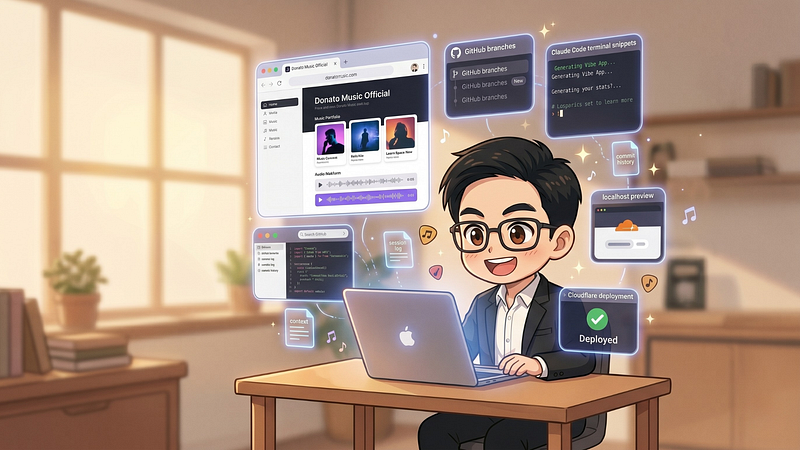
บทความนี้เหมาะสำหรับคนที่มีไอเดียอยากทำเว็บหรือแอปของตัวเอง แต่ยังไม่อยากเริ่มจากการเขียนโค้ดเต็มรูปแบบ
รอบนี้ผมลองทำ Web Portfolio สำหรับนักแต่งเพลง โดยใช้วิธี Vibe Coding + Prompt Design คือเริ่มจากการคุยกับ AI เพื่อช่วยออกแบบ UX/UI วางโครงสร้างหน้าเว็บ และ generate prototype ก่อน แล้วค่อยใช้เครื่องมืออย่าง Lovable, GitHub และ Claude Code ช่วยต่อยอดให้กลายเป็นโปรเจกต์จริง
โจทย์หลักของเว็บนี้คือ:
- ต้องดูเรียบง่าย แต่มีเอกลักษณ์
- ต้องโชว์เพลง ผลงาน และตัวตนได้ชัด
- ต้องต่อยอดเป็น portfolio สำหรับส่งค่ายเพลง หรือใช้สมัครงานด้าน songwriting / creative ได้
Stack ที่ใช้:
Lovable→ Generate UI จาก promptGitHub→ เก็บ code และทำ version controlClaude Code (CLI)→ ปรับโครงสร้าง code และต่อยอด logicLocalhost→ Run POC บนเครื่อง
Step 1: ใช้ ChatGPT ออกแบบ UX/UI
ผมไม่ได้วาด wireframe เองทั้งหมด
แต่ใช้ ChatGPT ช่วยเพื่อพูดคุย ปรับเปลี่ยน แก้ไข จนได้ Feature ที่ต้องการ
ผลลัพธ์ตามด้านล่าง
- Home
หน้าแรกควรทำให้คนรู้ทันทีว่า “คุณคือใคร” และ “แต่งเพลงแนวไหน”
ควรมี:
- ชื่อ / artist name
- tagline สั้น ๆ
- mood ของงาน
- รูปหรือ visual style ที่เป็นตัวคุณ
- เพลงเด่น 1-3 เพลง
- ปุ่มฟัง demo / ดูผลงาน / ติดต่อ
ตัวอย่าง tagline เช่น
- Songwriter for emotional pop, healing songs, and relatable stories.
- หรือ
- Writing songs about hope, heartbreak, and surviving hard days.
- About
เล่าว่าคุณเป็นใคร ทำไมถึงแต่งเพลง และถนัดแนวไหน
ไม่ต้องยาวมาก แค่พอให้คนเห็น personality เช่น
- ชอบแต่งเพลงแนวอะไร
- influence จากใครบ้าง
- จุดเด่นของคุณคืออะไร
- คุณอยากแต่งให้ศิลปินแนวไหน
อาจมี section สั้น ๆ เช่น
- Genres: Pop / Acoustic / Emotional / Healing
- Strengths: Hook, relatable lyrics, emotional storytelling
- References: Tilly Birds, NONT TANONT, Taylor Swift, Olivia Rodrigo
- Song Portfolio
อันนี้สำคัญที่สุด
แนะนำทำเป็น card/grid ของแต่ละเพลง แล้วกดเข้าไปดู detail ได้
แต่ละเพลงควรมี:
- ชื่อเพลง
- แนวเพลง
- mood
- reference artist
- เนื้อเพลงบางส่วน
- audio demo
- concept ของเพลง
- เพลงนี้เหมาะกับศิลปินแบบไหน
เช่น
เธอเก่งมากเลยวันนี้
- Mood: Healing / Emotional
- Style: Acoustic Pop
- Similar to: NONT TANONT x Billkin
- Hook: “เธอเก่งมากเลยวันนี้”
- Lyrics / Writing Samples
บางคนอาจยังไม่มี demo audio เยอะ แต่มีเนื้อเพลงเยอะ
หน้านี้เหมาะมากสำหรับโชว์ว่า “คุณเขียนดี”
อาจแบ่งเป็นหมวด:
- Love
- Sad
- Healing
- Motivational
- Commercial / Brand song
- Funny / Meme song
และให้คนกดอ่าน lyric แบบเต็มได้
- Visual Moodboard
อันนี้ช่วยมาก เพราะนักแต่งเพลงสมัยนี้ไม่ได้ขายแค่เพลง แต่ขาย “โลกของเพลง”
คุณชอบแนว golden hour, guitar, anime, emotional อยู่แล้ว หน้านี้เลยน่าจะเด่นมาก
ใส่ได้เช่น:
- reference image
- color palette
- visual direction
- เพลงนี้ควรหน้าตาแบบไหน
- mood video / album cover idea
จะช่วยให้ producer หรือ artist เห็นภาพเร็วขึ้นว่าเพลงของคุณ “หน้าตา” เป็นยังไง
- Credits / Work With
ถ้าเริ่มมีคนร่วมงาน หรือมีเพลงที่ปล่อยแล้ว ให้รวมไว้ตรงนี้
เช่น:
- เคยร่วมงานกับใคร
- เพลงไหนเคยปล่อย
- เพลงไหนมียอดวิว
- เคยแต่งเพลงประกวด / โปรเจกต์มหาลัย / งาน freelance
ต่อให้ยังไม่มีเครดิตใหญ่ ก็ใส่ได้ เช่น
- Wrote 30+ original songs across pop, acoustic, and emotional genres.
- Contact
หน้าสุดท้ายควรเรียบง่ายมาก
มีแค่:
- social links
- TikTok
- YouTube
- ปุ่มส่งข้อความ / inquiry form
ถ้าจะทำแบบ minimal จริง ๆ ผมว่าเริ่มแค่ 4 หน้าแรกก่อนก็พอ:
- Home
- About
- Songs
- Contact
แล้วพอมีผลงานเพิ่ม ค่อยแตกเป็น Lyrics, Moodboard, Credits ทีหลัง จะทำง่ายกว่าและไม่รู้สึกว่าเว็บโล่งเกินไป
################################################################################ WFP: https://gist.github.com/NattapongTH/588c457f724e4c4e84162cef40138d05
จากนั้นผมให้ ChatGPT ช่วย refine และย่อ prompt ให้พร้อมใช้งานกับ Lovable ด้านล่างคือ prompt final ที่ผมใช้จริง
คำสั่ง
ถ้าเราจะสั่ง AI ให้สร้าง web ตามด้านบน อยากให้สั้นกว่านี้ แต่อยากให้ครบถ้วน ช่วยเขียนให้สั้นลงหน่อย บอกให้ทำแต่หน้าแรก มีหน้าและฟังก์ชั่นตามด้านบน โดยทำแค่หน้าแรกและเมนูไว้ก่อน ขอ design, professional, minimal, clean ชื่อ App: Donato Music Official
################################################################################
Result
Create a professional, minimal, clean songwriter portfolio website called "Donato Music Official".
For now, only build the Home page, but include the full navbar/menu structure for future pages:
- Home
- About
- Songs
- Lyrics
- Moodboard
- Credits
- Contact
Home page goals:
- Make it clear who Donato is and what kind of songs he writes
- Emotional, cinematic, modern feel
- Minimal and premium design
- Clean layout with lots of whitespace
- Soft neutral colors with warm golden-hour accents
- Mobile responsive
Home page sections:
- Hero section
- Large artist name: Donato Music Official
- Short tagline like:
"Songwriter for emotional pop, healing songs, and relatable stories." - Short intro paragraph
- Main CTA buttons:
- Listen to Demo
- View Songs
- Contact
- Featured songs section
Show 3 featured song cards with:
- Song title
- Mood
- Style
- Similar artist
- Short hook line
- Play demo button
Example songs:
- You Did Well Today
- I Love My Job
- Letting Go of Sadness
- Visual identity section
- Show a moodboard / visual style preview
- Golden hour
- Guitar
- Anime-inspired
- Emotional
- Soft cinematic lighting
- Calm, dreamy atmosphere
- About preview section
- Short summary about Donato
- Genres: Pop / Acoustic / Emotional / Healing
- Strengths: Hook writing, relatable lyrics, emotional storytelling
- Contact preview section
- TikTok
- YouTube
- Simple contact button
Design direction:
- Professional
- Minimal
- Clean
- Modern
- Elegant
- Emotional
- Soft shadows
- Rounded corners
- Smooth hover animations
- Premium typography
- No clutter
ผลลัพธ์ที่ได้จาก Lovable — Home Page พร้อม Navigation ครบ
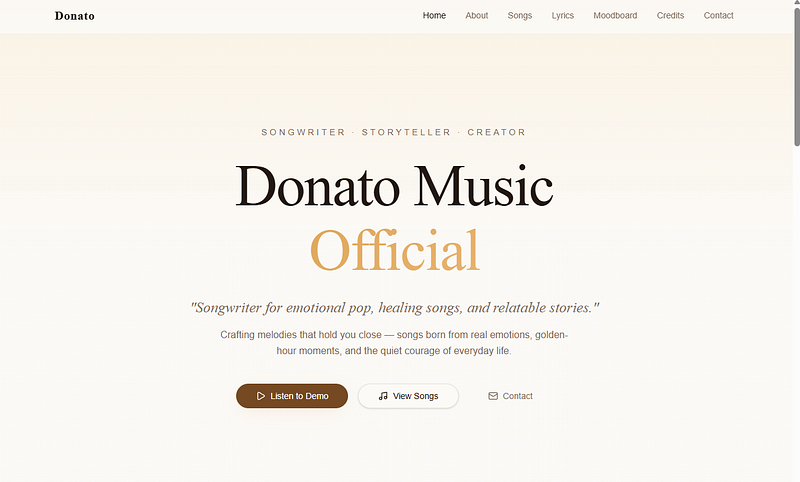
ถ้า Credit เหลือ และอยากให้ Lovable ร่างหน้าอื่นๆต่อ ก็ใช้ Prompt ด้านล่าง
<แนบรูป>
ได้หน้าแรกมาแล้ว
credit ยังพอเหลือ ขอไปต่อหน้า Song Portfolio
"""
<ใส่ข้อความที่ AI ด้านบนแนะนำมา>
"""
Step 2: เชื่อม Lovable เข้ากับ GitHub
หลังจากได้ UI ตามที่ต้องการในระดับหนึ่งแล้ว ขั้นตอนถัดไปของผมคือ link project จาก Lovable เข้าสู่ GitHub
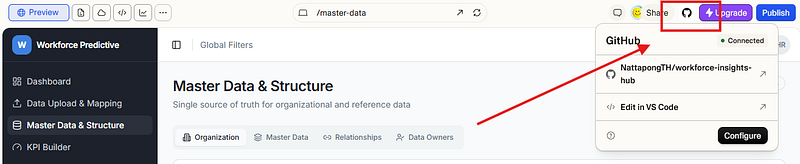
เชื่อมต่อโปรเจกต์เข้าสู่ GitHub ผ่านไอคอน GitHub
หลังจากเชื่อมต่อเรียบร้อย เราจะได้ repository ของโปรเจกต์นี้บน GitHub
Step 3: Clone repo ลงเครื่องตัวเอง
เมื่อ repo ขึ้นบน GitHub แล้ว ผมเปิด Git client ที่คุณใช้งาน (เช่น GitHub Desktop, Antigravity หรือเครื่องมืออื่น) แล้วทำการ clone repository ลงมาที่เครื่อง
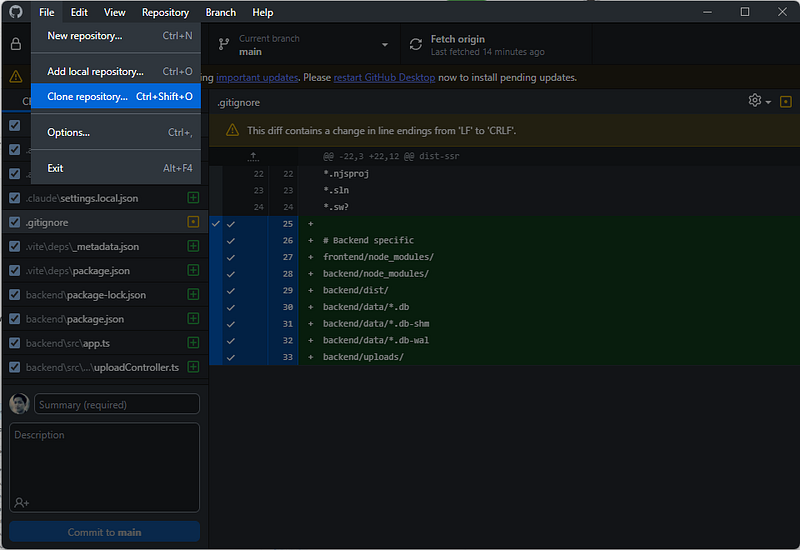
Clone Repository จาก GitHub ลงสู่ Antigravity (ผมใช้ตัวนี้)
เมื่อถึงจุดนี้ เราจะมี repository อยู่บน GitHub และ clone ลงมาไว้ในเครื่องเรียบร้อยแล้ว
Step 4: ติดตั้ง Claude Code เพื่อใช้ AI บน command line
จากนั้นผมติดตั้ง Claude Code เพื่อใช้เป็น AI command line assistant สำหรับช่วยแก้ ปรับ และต่อยอด project
ในมุมของผม Claude Code มีประโยชน์มากตอนที่ project เริ่มออกจาก phase generate UI และต้องเข้าสู่ phase ของการจัดโครงสร้าง code, แยก frontend/backend, run local, และปรับ logic เพิ่มเติม
เริ่มต้นด้วยการสมัคร Claude (รายเดือนประมาณ $20 หรือแบบรายปีเฉลี่ย ~$17/เดือน)
จากนั้นเปิด Terminal และติดตั้ง Claude Code พร้อมทำตามขั้นตอนในเอกสารของ Anthropic
npm install -g @anthropic-ai/claude-code
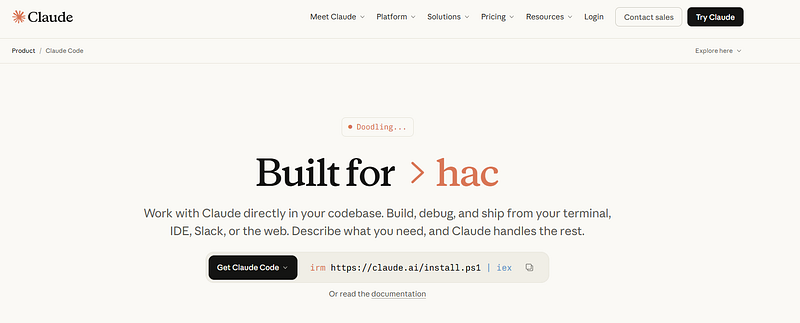
ตัวอย่างคำสั่งจาก https://claude.com/product/claude-code
irm https://claude.ai/install.ps1 | iex
หากระหว่างติดตั้งพบ error สามารถใช้ ChatGPT ช่วย troubleshoot และทำตามจนติดตั้งสำเร็จ
เมื่อติดตั้งเสร็จ ให้ลองพิมพ์คำสั่ง claudeใน Terminal
หากใช้งานได้ ระบบจะให้ตั้งค่าเบื้องต้น เช่น:
- Select text style
- Select logic method → ให้เลือกแบบแรก (Fixed cost ส่วนแบบที่สองจะคิดเงินตามจริง)
Step 5: เปิด repo และเริ่มใช้ Claude Code กับ project จริง
จากนั้นเปิด repository ที่ clone มา แล้วรันคำสั่ง claude ภายใน project
ระบบจะถามว่า: Do you trust the files in this folder?
เลือก: Yes, process เพื่อเริ่มใช้งาน
เพียงเท่านี้ Claude Code ก็พร้อมใช้งานในโปรเจกต์แล้ว
แยก frontend / backend
ในเคสนี้ เนื่องจากตอน generate ด้วย Lovable ผมยังไม่ได้แยก frontend และ backend
ผมจึงใช้ Claude ช่วยจัด structure ของโปรเจกต์ใหม่ โดยแยกออกเป็นสองส่วนหลัก
- frontend
- backend
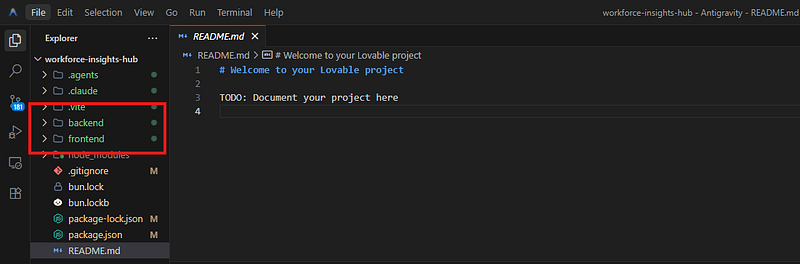
เมื่อแยก frontend และ backend เสร็จแล้วจะได้ 2 Folders นี้
หลังจากจัดโครงสร้างเรียบร้อย โปรเจกต์จะพร้อมสำหรับการพัฒนาต่อในระดับที่จริงจังมากขึ้น
จัด workspace ให้ทำงานสะดวก
สำหรับการทำงาน ผมเลือกจัด workspace ให้เห็นหลายส่วนพร้อมกัน เช่น
- ฝั่งซ้าย: ใช้คุยกับ Claude
- ตรงกลาง: Backend
- ฝั่งขวา: Frontend
(ส่วนนี้ขึ้นอยู่กับ preference ของแต่ละคน)
Run local เพื่อดูว่า project ขึ้นหรือไม่
ขั้นตอนถัดไปคือการลอง run โปรเจกต์บน local environment
หากสามารถเปิดผ่าน localhost (เช่น http://localhost:8080/)
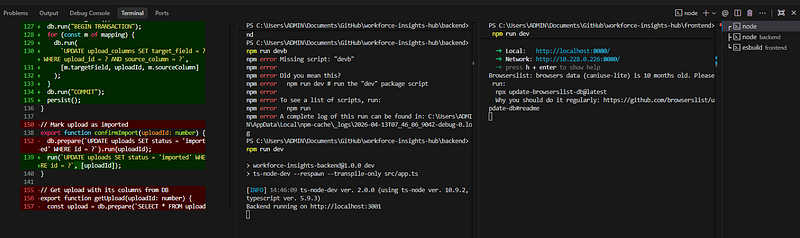
Link ที่ได้จะขึ้นอยู่หน้า Frontend
ถ้า UI แสดงผลได้ถูกต้อง สำหรับผมถือว่าอยู่ในสถานะที่ “พร้อม iterate ต่อ” แล้ว
จากจุดนี้ เราจะได้ code base ที่สามารถนำไปปรับปรุง พัฒนา และต่อยอด
สู่การเป็น POC application ที่สมบูรณ์ได้ในขั้นถัดไป
Step 6: บันทึก Context เพื่อทำงานต่อ
ในงานจริง เรามักไม่ได้ทำโปรเจกต์ให้เสร็จในวันเดียว
รวมถึงบางครั้งอาจเจอเคส เช่น:
- อยากให้ AI “จำ context” แล้วทำต่อวันถัดไป
- Credit ของ tool หมด (เช่น Claude / Lovable)
- อยากย้ายไปใช้ AI ตัวอื่น แต่ยังต่อเนื่องงานเดิมได้
สิ่งที่ผมทำคือสร้าง Agent Memory Layer ง่าย ๆ ไว้ในโปรเจกต์
สร้างโครงสร้างสำหรับเก็บ context
ผมสร้าง folder สำหรับเก็บสถานะงานและ session log
mkdir -p .agents/sessions
mkdir -p .agents/topics
touch .agents/active.md
โครงสร้างนี้จะช่วยให้:
- รู้ว่า “ตอนนี้กำลังทำอะไรอยู่”
- ย้อนดูได้ว่า “เมื่อวานทำอะไรไปแล้ว”
- ให้ AI ตัวใหม่เข้าใจ context ได้ทันที
ให้ Claude สรุปงานให้เราอัตโนมัติ
แทนที่จะเขียน log เอง ผมให้ Claude ทำให้ทั้งหมด
โดยใช้ prompt นี้:
Review the current project context from our conversation and the repository structure/code, then update .agents/active.md for me.
Format:
- Current task
- Status
- What was done
- Next step
- Blockers
Also create a session file:
.agents/sessions/YYYYMMDD-HHMM-topic.md
Format:
- What we did
- Key decisions
- Next actions
- Execution context (e.g. Claude / ChatGPT / other AI agent, if relevant)
Additional requirement:
- After each file (.agents/active.md and session file), add a short Thai summary (1 paragraph).
- The summary should be concise, easy to scan, and capture only the key points (current progress, key actions, and next steps).
- Do not repeat all details; summarize at a high level for quick understanding.
Keep everything concise and professional.
Infer the details from the existing context instead of asking me to list what I did.
If anything is unclear, make the best reasonable assumption and label it as assumed.
สิ่งที่ได้: Project Memory แบบอ่านรู้เรื่องทันที
หลังจากรันคำสั่งนี้ เราจะได้ไฟล์ 2 ส่วนหลัก
- Session Log (รายวัน): .agents/sessions/20260413-backend-setup-and-data-upload.md
ใช้สำหรับบันทึกว่า: วันนี้ทำอะไรไป, ตัดสินใจอะไรสำคัญ, พรุ่งนี้ควรทำอะไรต่อ
- Active Work (สถานะปัจจุบัน): .agents/active.md
ใช้สำหรับบอกว่า: ตอนนี้ทำอะไรอยู่, เสร็จถึงไหนแล้ว, next step คืออะไร
Treat AI like a team member ต้องมี “context” ให้เขาอ่านเสมอ
Step 7: Commit & Version Control เพื่อไม่ให้โปรเจกต์พัง
หลังจากเราเริ่มพัฒนาและปรับแก้ code ไปได้ระดับหนึ่ง
อีกสิ่งที่สำคัญไม่แพ้การเขียน code คือ การจัดการ version ของโปรเจกต์
เพราะในโลกจริง:
- เราอาจแก้ code พัง
- AI อาจ generate code ที่ผิด
- หรืออยากย้อนกลับไป version ก่อนหน้า
Commit code เป็นระยะ
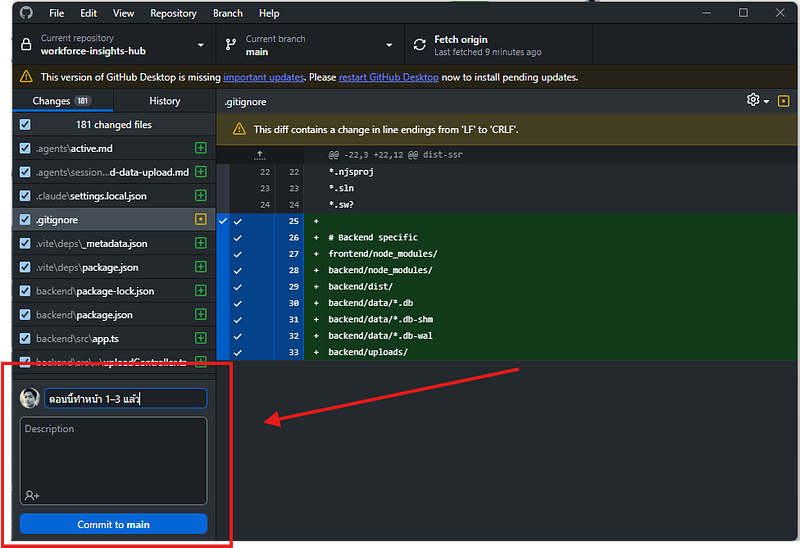
เมื่อมีการแก้ไข code เราจะเห็นสถานะไฟล์เปลี่ยนแปลงใน Git client
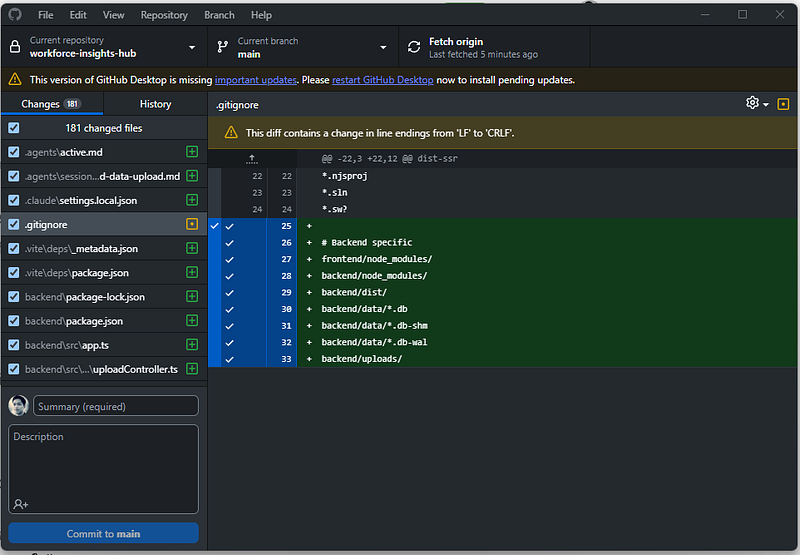
ตัวอย่างไฟล์ที่มีการแก้ไขแต่ยังไม่ได้ commit
แนวทางที่ผมใช้คือ:
- commit เป็นช่วง ๆ (ไม่ต้องรอให้เสร็จทั้งโปรเจกต์)
- เขียน message ให้ “ตัวเองในอนาคตอ่านรู้เรื่อง”
ตัวอย่าง:
feat: add dashboard + data upload pagerefactor: split frontend/backend structurefix: upload mapping bug
Push ขึ้น GitHub
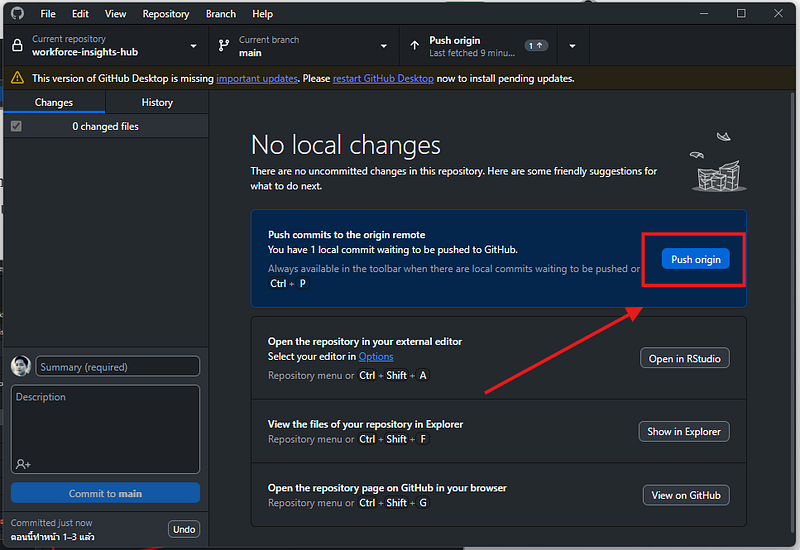
หลังจาก commit แล้ว ขั้นตอนถัดไปคือ push ขึ้น remote (GitHub)
- Commit → บันทึกในเครื่อง
- Push → อัปโหลดขึ้น server
สิ่งนี้ช่วยให้:
- มี backup ของ project
- ทำงานข้ามเครื่องได้
- แชร์ให้ทีมดูได้
ทำไม version control ถึงสำคัญ
Version control = safety net ของการใช้ AI
เพราะเวลาใช้ AI:
- บางครั้ง code ถูก generate แบบ “overwrite ทั้งไฟล์”
- หรือ logic เปลี่ยนแบบคาดไม่ถึง
การมี commit history จะช่วยให้:
- revert กลับได้ทันที
- compare version ได้
- ลดความเสี่ยงพังทั้งระบบ
Technique: เร่ง workflow ด้วย Claude CLI
เมื่อเริ่มชำนาญแล้ว บางครั้งเราอาจไม่อยากกด approve ทุก step
สามารถใช้ mode พิเศษของ Claude CLI ได้:
claude --dangerously-skip-permissions
เป็นคำสั่งรัน Claude CLI โดย “ข้ามการขอ permission” ทั้งหมด
mode นี้จะ:
- ข้ามการขอ permission
- ให้ AI แก้ code ต่อเนื่องได้ทันที
⚠️ ข้อควรระวัง:
- ใช้เฉพาะตอนที่เข้าใจ code แล้ว
- ไม่ควรใช้กับ project สำคัญโดยไม่มี commit backup
- ควร commit ก่อนทุกครั้ง
🔹 Mode อื่นที่ควรรู้
สามารถสลับ mode ได้ (shift ค้าง + tab) เช่น:
- bypass permission on → bypass approve (dangerous mode)
- accept edits on → ต้อง approve ทุกครั้ง (safe mode)
- plan mode → ให้ AI วางแผนก่อน ยังไม่แก้ code
Step 8: Deploy ขึ้น Cloudflare และเชื่อม Custom Domain
หลังจากโปรเจกต์สามารถ run บน local ได้แล้ว ขั้นตอนถัดไปคือการนำ code จาก GitHub ไป deploy ขึ้น Cloudflare Workers & Pages
ในขั้นตอนนี้ ผมเชื่อม repository จาก GitHub เข้ากับ Cloudflare เพื่อให้ Cloudflare build และ deploy เว็บให้อัตโนมัติ ทุกครั้งที่มีการ push code ขึ้น GitHub ก็สามารถอัปเดตเว็บได้ต่อเนื่อง
จากนั้นผมซื้อและจัดการ domain ผ่าน Cloudflare พร้อมเชื่อม custom domain เข้ากับ project
ผลลัพธ์คือเว็บสามารถเปิดใช้งานผ่าน domain จริงได้ที่:
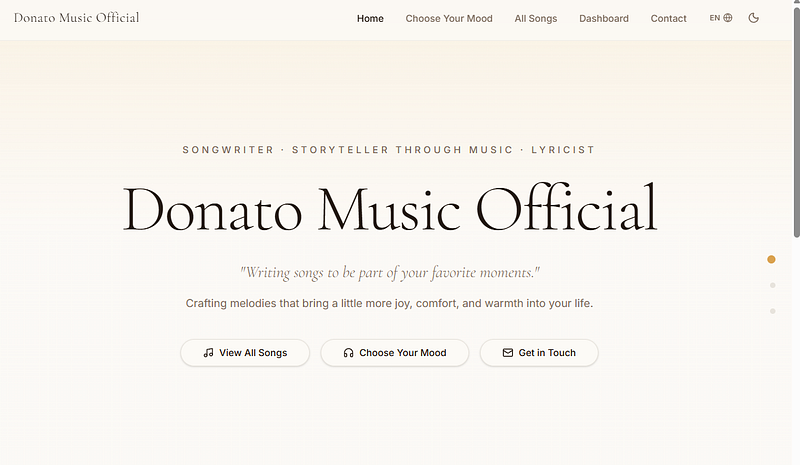
https://www.donatoofficial.com/
Donato Music Official - Songwriter _Donato is a songwriter crafting emotional pop, healing songs, and relatable stories. Listen to demos and explore…_www.donatoofficial.com
จุดนี้ทำให้โปรเจกต์ไม่ได้เป็นแค่ prototype บนเครื่องอีกต่อไป แต่กลายเป็นเว็บจริงที่สามารถแชร์ให้คนอื่นดู ใช้เป็น portfolio และต่อยอดต่อได้ในอนาคต.
ภาคผนวก: Tools ที่น่าสนใจสำหรับ AI Coding Workflow
หลังจากลองทำ workflow ด้วย Lovable, GitHub, Claude Code และ Cloudflare แล้ว ผมเจอ tools / repo ที่น่าสนใจอีก 2 ตัว ซึ่งน่าจะช่วยให้การใช้ AI coding agent ทำงานได้ดีขึ้นในโปรเจกต์ถัดไป
1. RTK: ช่วยลด Token จาก Terminal Output
RTK หรือ Rust Token Killer เป็น CLI proxy ที่ช่วยลดปริมาณ token จากผลลัพธ์ command line ก่อนส่งให้ AI coding agent อ่าน เช่น Claude Code, Codex, Cursor, Windsurf, Cline หรือ Gemini CLI
เวลาที่ AI รันคำสั่งอย่าง git status, git diff, npm test, pytest, docker logs หรือคำสั่งอื่น ๆ output จาก terminal มักจะยาวและมี noise เยอะ ทำให้กิน context และ token โดยไม่จำเป็น
RTK ทำหน้าที่เป็นตัวกลางในการกรองและย่อ output เหล่านั้นให้สั้นลง โดยใช้แนวทาง เช่น smart filtering, grouping, truncation และ deduplication ซึ่ง repo ระบุว่าสามารถช่วยลด token ได้ประมาณ 60–90% สำหรับ dev commands ทั่วไป
สรุปง่าย ๆ:
- RTK ไม่ได้ทำให้ AI ฉลาดขึ้นโดยตรง
- แต่ช่วยให้ AI อ่าน output จาก terminal ได้น้อยลง กระชับขึ้น และโฟกัสสิ่งสำคัญมากขึ้น
เหมาะกับโปรเจกต์ที่มีไฟล์เยอะ รัน test บ่อย ดู log บ่อย หรือใช้ AI coding agent ทำงานกับ command line เป็นประจำ
2. andrej-karpathy-skills: กติกาให้ AI เขียนโค้ดมีวินัยขึ้น
อีก repo ที่น่าสนใจคือ andrej-karpathy-skills ซึ่งเป็นชุด guideline สำหรับใส่ใน CLAUDE.md หรือ Cursor rules เพื่อปรับพฤติกรรมของ AI coding agent ให้ทำงานรอบคอบขึ้น
ต่างจาก RTK ที่ช่วยลด token จาก terminal output repo นี้เป็นเหมือน “กติกาประจำโปรเจกต์” ที่บอก AI ว่าควรคิดและแก้ code อย่างไร เช่น อย่าเดา requirement เอง อย่า over-engineer อย่าแก้ code ส่วนที่ไม่เกี่ยวข้อง และควร verify งานให้ชัดเจนก่อนสรุปว่าเสร็จแล้ว
หลักคิดสำคัญมีประมาณ 4 ข้อ:
- Think Before Coding: คิดก่อนเขียน ระบุ assumption และถามเมื่อโจทย์ไม่ชัด
- Simplicity First: แก้ให้เรียบง่าย ไม่ทำเกิน requirement
- Surgical Changes: แก้เฉพาะจุดที่จำเป็น ไม่ refactor มั่ว
- Goal-Driven Execution: มีเป้าหมายและวิธี verify งานที่ชัดเจน
สรุปง่าย ๆ:
- ถ้า RTK คือเครื่องมือช่วยให้ AI อ่าน terminal output น้อยลง
- andrej-karpathy-skills คือ guideline ที่ช่วยให้ AI แก้โค้ดแบบมีวินัยมากขึ้น
สำหรับ workflow ที่ใช้ Claude Code หรือ Cursor ผมคิดว่าสองตัวนี้สามารถใช้ร่วมกันได้ดีมาก:
CLAUDE.md/ rules → คุมพฤติกรรม AI- RTK → ลด noise จาก terminal output
.agents/→ เก็บ context และ session log- Git commit → เป็น safety net เวลากลับไป version ก่อนหน้า
ภาพรวมคือไม่ได้ใช้ AI แค่ให้ generate code เร็ว ๆ แต่เริ่มสร้าง workflow ที่ทำให้ AI ทำงานเหมือน team member ที่มี context, rule และ process ชัดเจนมากขึ้น.
สำหรับผม นี่เป็นแค่ Vibe Coding แรก ๆ ที่ลองทำจริงจัง
แต่สิ่งที่เห็นชัดคือ AI ไม่ได้มาแทน developer ทั้งหมดทันที
แต่มันช่วยให้คนที่มีไอเดีย สามารถเปลี่ยนไอเดียให้กลายเป็น prototype ได้เร็วขึ้นมาก
จากเดิมที่ต้องเริ่มจาก “เขียนโค้ดยังไงดี”
ตอนนี้เริ่มจาก “อยากสร้างอะไร และอยากให้ user รู้สึกยังไง” ได้เลย
Data Science Explore the world of data science with Donato_Story
Dashboard Discover the power of data visualization with Donato_Story
Donato_Journey Join me on my journey (Thai version)
Course_Review Discover the training courses with Donato_Story (Thai version)
Let’s Connect!
Your thoughts and feedback are invaluable. Feel free to share them in the comments or connect with me on
- Medium: medium.com/donato-story
- Facebook: web.facebook.com/DonatoStory
- Linkedin: linkedin.com/in/nattapong-thanngam
Originally published on Medium
Related

GenAI Tools & Tips Beyond ChatGPT (EP2)
พามารู้จัก Generative AI ฝั่ง Google

เริ่มต้นกับ Claude Ecosystem
ทำความรู้จัก Claude Chat, Claude Cowork และ Claude Code

10 เรื่องเกี่ยวกับ Claude ที่น่าเอาไปใช้ต่อ — EP.1
รวมแนวคิดจากหลายบทความและ Open Source Project สำหรับคนที่อยากใช้ AI ให้เก่งกว่าแค่ถาม-ตอบ

20 AI Use Cases สนุก ๆ ที่ผมลองแล้วอยากบอกต่อ — EP1
Prompt และเทคนิคเล็ก ๆ ที่ช่วยให้เราใช้ Generative AI ได้มากกว่าการคุยกับ Chatbot